
The key to perfect, non-toxic frying isn’t just a high smoke point; it’s understanding an oil’s chemical stability and using the right technique.
- Unrefined oils contain impurities (free fatty acids) that burn quickly, creating toxic acrolein and a bitter taste, even below their official smoke point.
- Maintaining a stable oil temperature by using a heavy pot and adding food in small batches is more critical than the specific oil you choose.
Recommendation: For deep frying, choose a refined oil with a neutral flavor like canola or grapeseed. For flavor and health, a quality extra virgin olive oil is surprisingly stable for shallow frying due to its antioxidants.
The dream of perfectly golden, crispy fried food can quickly turn into a nightmare: a kitchen filled with acrid smoke, a blaring smoke alarm, and food that tastes bitter and burnt. For many home cooks, especially those wary of kitchen fires, high-heat frying feels like a dangerous gamble. You’ve likely heard the common advice: pick an oil with a high smoke point. While this isn’t wrong, it’s a dangerously incomplete piece of the puzzle. The fear of burning oil or starting a fire often stems from not understanding what’s truly happening at a chemical level.
The conversation around frying oils often revolves around simple lists of “good” and “bad” oils, focusing almost exclusively on a single number: the smoke point. We’re told to avoid extra virgin olive oil for searing and to reach for something neutral and refined. But what if the secret to safe and delicious frying wasn’t just about choosing a different bottle, but about mastering the physics and chemistry of the entire process? What if factors like your cooking pot, the moisture on your food, and even the salt you use have a greater impact on safety and flavor than the oil’s label?
This guide moves beyond the simplistic smoke point charts. Instead, we’ll adopt the perspective of a food chemist to understand the principles of oil degradation, thermal stability, and heat management. By grasping the “why” behind the smoke, you’ll gain the confidence to control the heat, achieve that coveted crispy texture, and ensure your fried creations are both delicious and safe. We will explore not just which oil to use, but how to use it correctly, from preventing dangerous overflows to disposing of it responsibly. This is your path to mastering hot oil, not fearing it.
To navigate this essential topic, we have broken down the science and techniques of safe frying into clear, manageable sections. This structure will guide you from the fundamental chemistry of oils to the practical steps for achieving perfect results in your own kitchen.
Summary: Mastering High-Heat Frying for Safety and Flavor
- Why Unrefined Oils Turn Bitter and Toxic Above 350°F?
- How to Keep Oil Temp Stable When Adding Cold Ingredients?
- The Pot Fill Rule That Prevents Dangerous Oil Overflows
- Wet vs Dry Hand: The Breading Method That Keeps Your Fingers Clean
- Where to Dispose of Used Oil to Avoid Clogging Your Pipes?
- Flash Point Awareness: How to Prevent a Grease Fire When Flambéing?
- Can You Fry in Olive Oil Without Creating Toxic Compounds?
- The 5 “Hidden” Additives in Your Pantry That Sabotage Clean Cooking
Why Unrefined Oils Turn Bitter and Toxic Above 350°F?
The term “smoke point” is often misunderstood as a single, fixed temperature. In reality, it’s the beginning of a process called thermal degradation. When an oil is heated past its stability threshold, its triglyceride structure breaks down. For unrefined oils, this happens sooner because they are full of impurities like free fatty acids (FFAs), pigments, and other plant compounds. While these lend flavor and nutrients at low temperatures, they are highly unstable under heat. When these FFAs break down, they produce a range of volatile compounds, the most notorious of which is acrolein. This is the chemical responsible for the sharp, acrid smell of burnt oil and the bitter, unpleasant taste it imparts to food.
The temperature at which this process begins varies widely; while some robust refined oils are stable up to 500°F, many unrefined oils begin to break down well below 400°F. In fact, most cooking oils smoke at temperatures ranging from 325 to 520 degrees Fahrenheit, a vast spectrum that highlights the importance of choosing the right type. The level of FFAs is a direct predictor of an oil’s stability. Research shows that plant oils with low FFA content are more stable, whereas animal fats like lard or butter, which have higher FFA levels, begin to smoke at much lower temperatures, typically around 375°F (190°C). This chemical reality is why refined oils—which have had these impurities filtered out—offer a much safer and more neutral-tasting medium for high-heat cooking.
So, when you choose an unrefined oil for frying, you are not just risking a smoky kitchen; you are initiating a chemical reaction that creates toxic compounds and ruins the flavor of your dish. The goal is to cook the food in the oil, not to cook the oil itself. Understanding this distinction is the first step toward mastering high-heat frying. It’s about preserving the integrity of the oil to ensure a clean flavor transfer and a safe cooking environment.
How to Keep Oil Temp Stable When Adding Cold Ingredients?
One of the biggest challenges in frying is managing the dramatic temperature drop that occurs when you add cold or room-temperature food to hot oil. A significant dip in temperature is the enemy of crispiness; it causes food to absorb excess oil, resulting in a greasy, soggy texture. The key to preventing this lies in physics: you need a “thermal battery.” A heavy-bottomed pot, such as one made of cast iron or enameled cast iron, is ideal. These materials have high thermal mass, meaning they absorb and hold a large amount of heat. They act like a battery, releasing stored energy to quickly counteract the cooling effect of the food, helping the oil return to the target temperature faster.
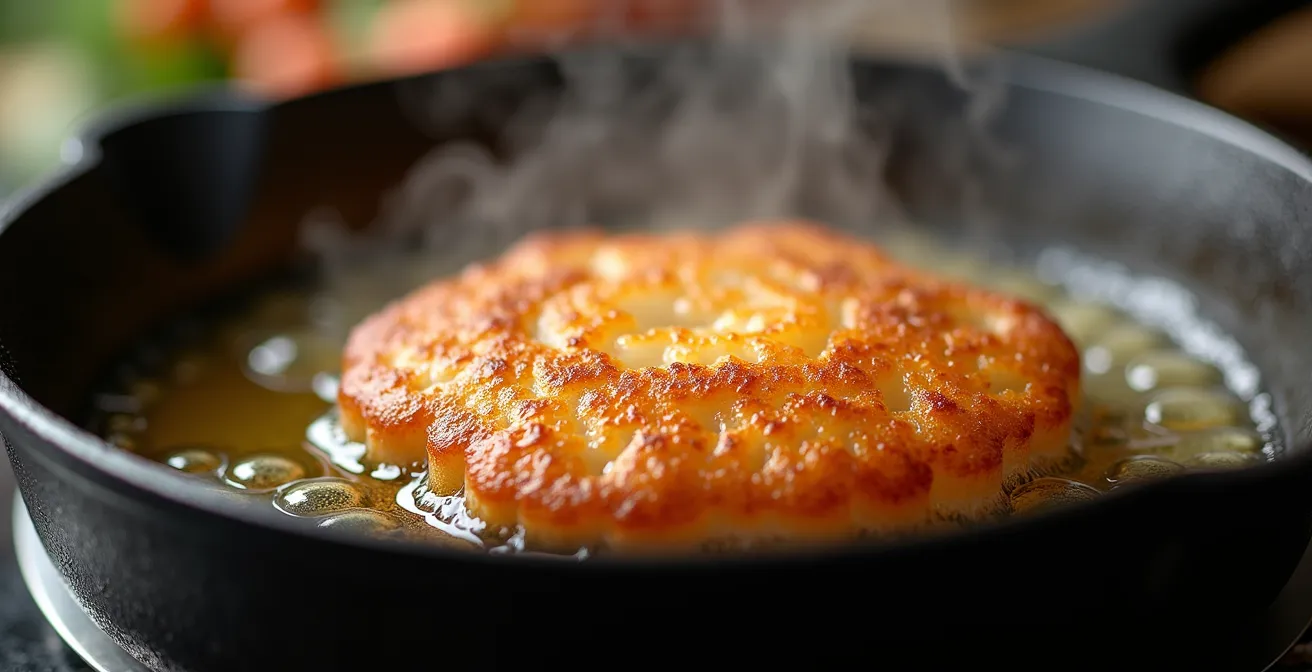
As the illustration above demonstrates, a thick-walled pot maintains a stable reservoir of heat. This stability is critical. Another common mistake is overcrowding the pan. Adding too much food at once guarantees a massive temperature drop that even the best pot can’t overcome. To maintain a steady temperature, fry in small, manageable batches, allowing the oil to recover to its optimal temperature (typically 350-375°F or 175-190°C) between each batch. A good quality deep-fry or candy thermometer is an indispensable tool here; don’t rely on guesswork. Finally, ensure your food is as dry as possible before it enters the oil. Water is the primary cause of dangerous splattering, and excess moisture on the food’s surface must be boiled away before browning can begin, further lowering the oil’s temperature.
By combining a heavy pot, batch cooking, and careful temperature monitoring, you create a stable frying environment. This technical mastery ensures that your food cooks quickly and evenly, forming a crisp, golden-brown crust on the outside while remaining tender and juicy on the inside. You are no longer just dropping food in hot oil; you are managing a controlled thermal system for a perfect outcome.
The Pot Fill Rule That Prevents Dangerous Oil Overflows
Beyond burnt flavors, the most immediate danger of deep frying is a boil-over, which can lead to a devastating grease fire. This terrifying scenario is almost always preventable by following one simple, non-negotiable rule: never fill your pot more than halfway with oil. When you add food, two things happen simultaneously: the food displaces a volume of oil equal to its own, and the moisture within the food rapidly turns to steam, causing the oil to bubble up violently. If the oil level is too high, this combination of displacement and vigorous bubbling can easily cause it to spill over the sides of the pot and onto the hot burner, where it can ignite.
For effective frying, you need enough depth for the food to be fully submerged without touching the bottom of the pot. A common guideline is that deep frying requires oil at a minimum depth of 2 inches, but this must always be balanced against the 50% capacity rule. Before you even turn on the heat, place the food you intend to fry into the empty pot to gauge the displacement. Then add water to see how high the level rises. This gives you a safe visual marker for how much oil you can add. Always remember to thoroughly dry the pot before adding the oil.
This “pot fill rule” is a fundamental principle of kitchen safety. It acknowledges the violent physics at play during frying and provides a simple, effective boundary to prevent disaster. Choosing the right size and shape of pot is also crucial. A deep, straight-sided pot is much safer than a shallow, wide one, as it contains the bubbling and potential splatters more effectively. Adhering to this rule removes one of the greatest fears associated with deep frying, allowing you to focus on the cooking process with confidence and control.
Wet vs Dry Hand: The Breading Method That Keeps Your Fingers Clean
A perfect fry often starts with a perfect coating. But the standard breading procedure—dredging in flour, dipping in egg wash, and coating in breadcrumbs—frequently results in “club hand,” where your fingers become caked in a gummy paste of flour and egg. This isn’t just messy; it leads to an uneven coating on your food and wastes ingredients. The solution is a disciplined technique known as the “wet hand, dry hand” method. This simple system assigns a specific role to each hand, preventing the cross-contamination that creates the mess.
The setup, often called the “three-pan shuffle,” involves arranging three shallow dishes in a line. Your right hand (if you are right-handed) is designated the “dry hand” and will only ever touch the dry ingredients: flour and breadcrumbs. Your left hand becomes the “wet hand,” responsible exclusively for transferring the food through the egg wash. By following this strict division of labor, your dry hand never gets wet, and your wet hand never picks up dry flour, eliminating the paste buildup. This ensures a clean, even coating on every piece of food and keeps your hands remarkably clean throughout the process.
Your Action Plan: The Three-Pan Shuffle for Perfect Breading
- Arrange the Station: Place three shallow dishes from left to right: the first with seasoned flour, the second with egg wash (eggs beaten with a little water or milk), and the third with breadcrumbs or another coating. If you’re left-handed, reverse the order.
- Designate Your Hands: Your dominant hand is the “dry hand” (for flour and breadcrumbs). Your non-dominant hand is the “wet hand” (for egg wash only).
- Execute the Sequence: Use your dry hand to place the food in the flour and coat it. Shake off the excess. Use the same dry hand to drop it into the egg wash. Now, switch to your wet hand to turn the food in the egg and lift it out, allowing excess to drip off. Drop it into the breadcrumbs. Finally, switch back to your dry hand to coat the food thoroughly in breadcrumbs.
- Rest the Coating: Place the breaded items on a wire rack for at least 15-20 minutes before frying. This crucial step allows the coating to hydrate and adhere firmly to the surface, preventing it from falling off in the hot oil.
Mastering this technique transforms breading from a dreaded, messy chore into a clean and efficient part of your cooking workflow. The resulting secure, even coating is the foundation for a spectacularly crispy and golden-brown finish.
Where to Dispose of Used Oil to Avoid Clogging Your Pipes?
Once your delicious, crispy meal is finished, you’re left with a pot of used cooking oil. The absolute worst thing you can do is pour it down the drain. While it may be liquid when hot, oil solidifies as it cools, coating the inside of your pipes. Over time, it combines with other debris to form massive, stubborn blockages known as “fatbergs.” Worse, if you try to use a chemical drain cleaner, the lye in the cleaner can react with the fat in a process called saponification, creating a hard, soap-like substance that is even more difficult to remove than the original grease clog.
The responsible disposal method is straightforward. First and foremost, let the oil cool completely to room temperature. This is a critical safety step. Never handle a large volume of hot oil. Once cool, the best option is to check for local recycling programs. Many municipalities have collection centers that accept used cooking oil and recycle it into biodiesel. This is the most environmentally friendly choice. If recycling isn’t an option, the standard household method is to pour the cooled oil into a non-recyclable, sealable container—like an old milk jug, a plastic bottle with a screw-top lid, or the original oil container. Make sure the lid is tight, and then dispose of the entire container in your regular trash.
For an extra layer of safety, especially with larger quantities of oil, you can mix the cooled oil with an absorbent material like used coffee grounds, cat litter, or sawdust before sealing it in the container. This helps prevent leaks if the container is punctured. Proper disposal protects your plumbing, your local water treatment facilities, and the environment. It’s the final, responsible step in the life cycle of cooking with oil.
Flash Point Awareness: How to Prevent a Grease Fire When Flambéing?
While a smoky kitchen is an annoyance, a grease fire is a true emergency. Understanding the difference between an oil’s smoke point, flash point, and fire point is crucial for preventing one. The smoke point is simply where the oil begins to visibly smoke and break down. If you continue to heat the oil, it will eventually reach its flash point. This is the temperature at which the oil produces enough flammable vapors that they can be ignited by an external flame. Continue heating further, and you’ll reach the fire point, where the oil is hot enough to sustain a continuous flame on its own. For most cooking oils, the oil vapors can ignite at the flash point of ~600°F (315°C), with the fire point being around 700°F (370°C).
This danger is most acute during techniques like flambéing, where alcohol is intentionally ignited in a hot pan. Performing this incorrectly can easily lead to a grease fire. The key to safe flambéing is control. The alcohol, not the oil, should be the source of the flame. The process must be done with extreme care:
- Remove the pan from the heat. This is the most important step. Never add alcohol to a pan that is over an open flame.
- Add the high-proof spirit (at least 80 proof/40% ABV) to the edge of the pan, not the center.
- Tilt the pan away from your body and face.
- Using a long-handled lighter or match, carefully ignite the vapors at the edge of the pan.
- Allow the flames to burn out completely as the alcohol is consumed before returning the pan to the heat source.
In the event of a grease fire, never use water to extinguish it; this will cause a violent explosion of flaming oil. Instead, turn off the heat source and smother the flames by sliding a metal lid or a baking sheet over the pan. Having a Class B (or ABC) fire extinguisher in your kitchen is the ultimate safety measure. Knowing these temperature thresholds and safety protocols demystifies the risk and empowers you to cook with confidence.
Can You Fry in Olive Oil Without Creating Toxic Compounds?
One of the most persistent myths in the cooking world is that you should never fry with extra virgin olive oil (EVOO). The common belief is that its relatively low smoke point makes it unstable and prone to creating toxic compounds at high heat. However, recent research and a deeper understanding of oil chemistry paint a very different picture. While EVOO does have a lower smoke point than highly refined oils, its stability is not determined by that number alone. It is exceptionally rich in polyphenols and other powerful antioxidants, which protect the oil from oxidative damage even when heated.
As the following table shows, the right type of olive oil is suitable for many frying applications, far beyond simple dressings. While not recommended for deep frying where oil is held at high temperatures for extended periods, it is an excellent choice for shallow frying and sautéing.
This table, based on an in-depth analysis of olive oil smoke points, clarifies which type of olive oil to use for different cooking methods.
| Frying Method | Temperature Range | Best Olive Oil Type | Smoke Point |
|---|---|---|---|
| Deep Frying | 350-375°F | Refined/Light Olive Oil | 465°F |
| Shallow Frying | 320-350°F | Extra Virgin Olive Oil | 410°F |
| Sautéing | 250-320°F | Extra Virgin Olive Oil | 410°F |
| High-Heat Searing | 400°F+ | Not Recommended | N/A |
The protective nature of these antioxidants is remarkable. In fact, research from Olive Oil Lovers highlights this surprising resilience:
Extra virgin olive oil shows impressive stability against oxidation even when heated at temperatures over 350°F for 36 hours straight, maintaining most of its nutritional properties due to powerful antioxidant polyphenols.
– Olive Oil Lovers Research, Olive Oil Smoke Point Study
The takeaway is that for most home cooking, including pan-frying chicken cutlets or sautéing vegetables, a good quality EVOO is not only safe but also healthier than many refined oils, as it retains its beneficial compounds and imparts a superior flavor. The fear of creating toxic compounds is largely unfounded when used within the appropriate temperature ranges.
Key Takeaways
- The stability of a frying oil depends more on its refinement level and antioxidant content than just its smoke point.
- Maintaining a stable oil temperature with a heavy pot and batch cooking is crucial for preventing greasy food.
- Safety is paramount: never fill a pot more than halfway with oil, and know the difference between smoke point and flash point to prevent fires.
The 5 “Hidden” Additives in Your Pantry That Sabotage Clean Cooking
Even if you’ve chosen the perfect oil and mastered temperature control, your frying efforts can be sabotaged by unexpected ingredients lurking in your pantry. These “hidden” additives can cause your oil to break down faster, create off-flavors, and even make your food burn. The most common culprit is sugar. Many marinades, rubs, and even store-bought breadings contain sugar (or ingredients like honey and corn syrup). These sugars in marinades and breadings burn at temperatures below 350°F, long before your food is fully cooked. This results in a dark, almost burnt exterior while the inside remains raw, and it will quickly degrade your cooking oil.
Another saboteur is found in common table salt and powdered spices: anti-caking agents like silicon dioxide or calcium silicate. These microscopic particles do not dissolve in oil. Instead, they remain suspended, causing the oil to become cloudy and creating a gritty texture on fried foods. More importantly, these agents act as catalysts that accelerate the breakdown of the oil, effectively lowering its smoke point and reducing its usable lifespan. Using pure, coarse salts (like kosher or sea salt) and whole or freshly ground spices can make a significant difference in maintaining the quality and longevity of your frying oil.
The list of saboteurs includes:
- Sugars: Found in marinades, sauces, and some spice blends. They caramelize and burn quickly.
- Anti-caking agents: Present in table salt and powdered spices. They make oil cloudy and accelerate breakdown.
- Excessive fine flour: Using too much fine-milled flour for dredging can introduce burnt particles into the oil.
- Emulsifiers: Found in some processed seasonings, they can cause foaming and splattering.
- Artificial flavorings: Certain volatile flavor compounds can break down at high heat, creating bitter tastes.
By being mindful of these hidden additives and opting for pure ingredients, you protect the integrity of your cooking oil. This ensures a cleaner flavor, a longer lifespan for your oil, and a perfectly golden, non-burnt result every time. It’s the final layer of expertise that separates good frying from great frying.
Frequently Asked Questions About High-Heat Frying
Can I reuse frying oil?
Yes, you can, but with care. Allow the oil to cool completely, then strain it through several layers of cheesecloth or a fine-mesh sieve to remove all food particles. Store it in a sealed, light-proof container in a cool, dark place (or preferably, the refrigerator) for up to 3 months. This prevents it from going rancid.
How do I know when oil should be discarded?
There are several clear signs that your oil is spent. Discard it if it starts to smoke before reaching your target frying temperature (e.g., smoking below 375°F), if it has developed a dark color, a thick or foamy texture, or if it smells rancid or strongly of the foods you’ve previously cooked in it.
What happens if I pour oil down the drain?
Pouring oil down the drain is a costly mistake. As it cools, it solidifies and clogs pipes. When mixed with chemical drain cleaners containing lye, a chemical reaction called saponification can occur, creating hard, soap-like blockages that are even worse than the original grease clogs and often require a professional plumber to remove.