The secret to a magnificent roast isn’t a complex recipe, but the simple, non-negotiable science of resting the meat properly.
- Cutting a roast too soon forces out up to 40% of its natural juices, guaranteeing a dry result.
- True, deep flavour in gravy comes from deglazing the caramelised pan scrapings, known as the “fond,” not from a packet.
- Perfect Yorkshire puddings rise from the “steam shock” created when cold batter hits smoking hot fat.
Recommendation: Master the core principles of heat, timing, and resting to transform your Sunday dinner from just another meal into a cherished, delicious tradition.
There’s a certain magic to the Sunday roast. It’s more than just a meal; it’s the aroma filling the house, the clatter of cutlery, and the gathering of family around a well-laden table. Yet, for many home cooks, there’s a nagging anxiety that accompanies this tradition. The fear of carving into a beautiful joint of beef, only to find it dry and tough, or serving up flat, dense Yorkshire puddings, can turn a joyful occasion into a stressful one. We’ve all heard the standard advice: rest the meat, get the oil hot, use the pan juices. These are the well-trodden paths of Sunday cooking.
But what if the real key isn’t just knowing *what* to do, but deeply understanding *why* you’re doing it? The difference between a decent home-cooked roast and a truly magnificent one—the kind that’s spoken about for days—lies in a few fundamental culinary principles. These are the secrets that professional chefs live by, techniques grounded in the science of cooking that most home recipes gloss over. It’s not about complicated steps or exotic ingredients; it’s about harnessing heat, time, and chemistry to your advantage.
This is where your Sunday roast transforms. The secret that 90% of cooks ignore isn’t a single trick; it’s a mindset. It’s the understanding that resting meat isn’t a passive waiting game, but an active process of moisture redistribution. It’s knowing that the dark, sticky bits in the bottom of your roasting tin are not burnt mistakes but concentrated gold, the very soul of a proper gravy. In this guide, we’ll pull back the curtain on these professional techniques. We will break down the essential pillars of a perfect roast, from achieving a juicy, flavourful joint every time to troubleshooting the common pitfalls of gravy, Yorkshire puddings, and accompaniments. Prepare to elevate your Sunday tradition.
This guide breaks down the core techniques that separate a good roast from a great one. Below, you will find a detailed table of contents guiding you through each critical stage of mastering this classic British meal.
Summary: Mastering the Art of the Traditional Sunday Roast
- Why Cutting Roast Beef Too Early Drains 40% of the Juices?
- How to Deglaze Roast Drippings for a Rich, Lump-Free Gravy?
- Cold Batter or Hot Oil: What Makes Yorkshire Puddings Rise High?
- Potatoes vs Carrots: When to Add Veggies to the Roasting Pan?
- How to Store Roast Beef to Ensure Moist Sandwiches on Monday?
- Direct vs Indirect Heat: The Setup for Grilling Whole Chicken
- Why Slicing Lean Steak Immediately Ruins the Texture?
- How to Assemble a Thanksgiving Platter That Stays Hot and Looks Professional?
Why Cutting Roast Beef Too Early Drains 40% of the Juices?
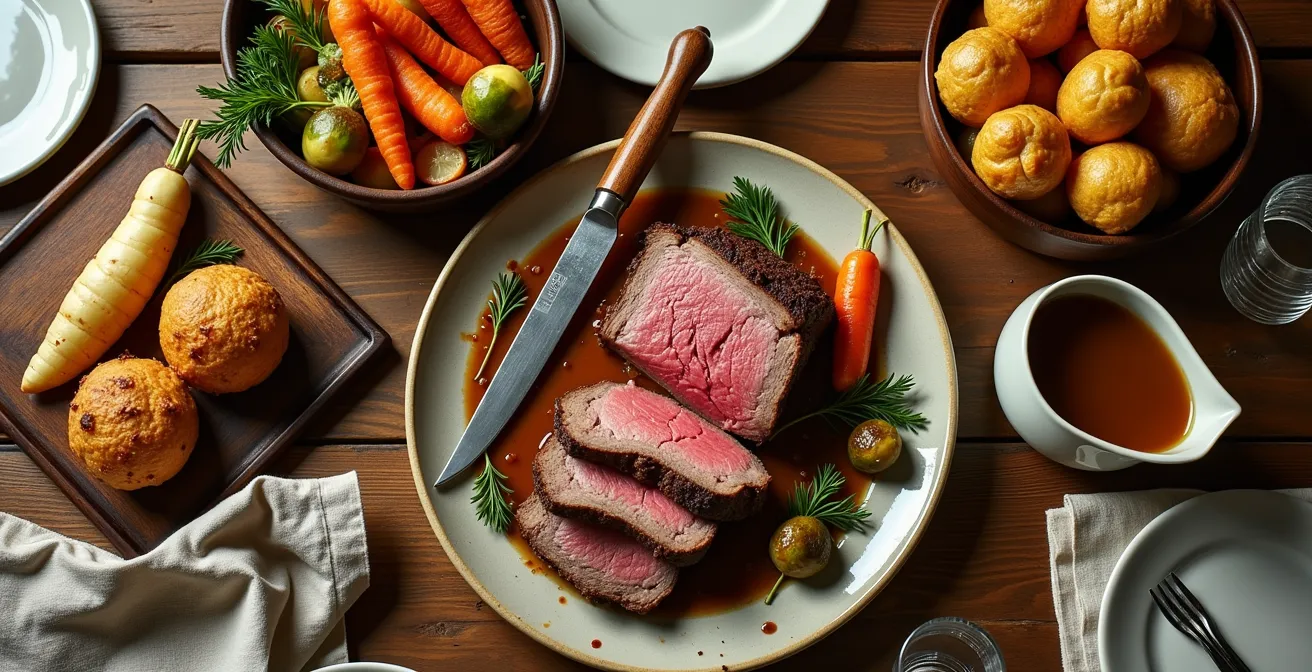
The single most critical mistake in roasting, and the one that separates amateurs from seasoned cooks, is impatience. When a joint of beef comes out of the oven, its muscle fibres are tense and constricted from the heat, having squeezed their moisture toward the centre of the cut. If you slice into it immediately, this pool of internal juice has nowhere to go but out, flooding your carving board and leaving the meat disappointingly dry and grey. This isn’t just a minor error; you can lose up to 40% of the meat’s moisture this way. The secret isn’t just to rest the meat; it’s to understand that resting is an active part of the cooking process.
This is where the science of myofibrillar relaxation comes into play. As the meat cools slightly away from the oven’s fierce heat, the tense muscle fibres begin to relax and reabsorb that precious, flavour-packed juice. This redistribution ensures every slice is moist, tender, and succulent. Furthermore, a process called carryover cooking continues to raise the internal temperature by 5-10°F after it leaves the oven. Factoring this in is crucial for hitting your perfect level of doneness, whether it’s rare, medium, or well-done. As a rule, a small roast needs a minimum of 15 minutes, while a large joint can benefit from up to 45 minutes. Indeed, many professional cooking guides recommend this extended time to ensure maximum juice retention while keeping the beef perfectly warm.
Your Action Plan: The Perfect Resting Technique for Roast Beef
- Remove the roast from the oven 5-10°F before your target temperature to allow for carryover cooking.
- Transfer the joint to a warm platter or a wire rack, never a cold plate that will drain its heat.
- Tent the meat loosely with foil; this maintains warmth without steaming the crust and making it soft.
- Rest for a minimum of 15 minutes for small roasts and up to 45 minutes for larger joints of beef.
- Save any juices that collect on the platter during resting—this is liquid gold to be added back into your gravy.
Ignoring this crucial pause is the fastest way to ruin an expensive cut of meat. Patience is rewarded with juicy, flavourful beef that becomes the star of the show.
How to Deglaze Roast Drippings for a Rich, Lump-Free Gravy?
A proper gravy is the soul of a Sunday roast, and it doesn’t come from a packet. Its foundation lies in the dark, caramelised, and sometimes crusty bits stuck to the bottom of your roasting pan. This is not burnt residue to be scrubbed away; this is the fond, a French culinary term for the concentrated proteins and sugars that form during roasting. The process of dissolving this flavour base with a liquid—known as deglazing—is the secret to a gravy with unparalleled depth and complexity. This is the Maillard reaction in its most glorious form, and learning to harness it will change your gravy game forever.
The technique is simple but transformative. After removing your roast to rest, you’re left with the fond and rendered fat in the pan. Your first job is to pour off most of the excess fat, leaving about a tablespoon behind. Then, place the roasting pan directly on the stovetop over medium heat. This is where the magic happens. A splash of liquid—be it red wine, stock, or even water—hits the hot pan and instantly begins to bubble and steam, lifting the fond from the bottom. This process captures every last drop of roasted flavour.

As the liquid simmers, use a wooden spoon to gently scrape all those flavourful brown bits, watching them dissolve and enrich the liquid. This simple action transforms a thin, watery base into a rich, dark, and intensely savoury foundation for your gravy. From here, you can create a slurry of flour and cold water to thicken it, ensuring a smooth, lump-free consistency that commercial gravy granules can only dream of. The table below addresses the most common gravy failures and their professional remedies.
Professional Chef’s Gravy Technique
Hungry Huy’s Sunday roast recipe perfectly demonstrates the professional deglazing technique. After the beef is removed, the roasting pan is placed on the stovetop. Red wine or stock is added to the hot pan, and a wooden spoon is used to scrape up the caramelised fond (not the burnt bits). These browned meat proteins dissolve into the liquid, creating a deep, complex flavour that no gravy packet could ever replicate, forming the very essence of a homemade gravy.
Mastering this single technique will elevate your entire meal, tying all the elements together with a rich, authentic, and deeply satisfying sauce.
Cold Batter or Hot Oil: What Makes Yorkshire Puddings Rise High?
There is no greater tragedy on a Sunday dinner plate than a flat, dense Yorkshire pudding. The goal is a magnificent, golden-brown creation that is light, airy, and crisp, with a slightly squidgy bottom. The secret to achieving this spectacular rise isn’t a secret ingredient or a complicated recipe; it lies in a fundamental principle of physics: extreme temperature contrast. It is the violent reaction of pouring a cold batter into searingly hot fat that creates an explosive burst of steam—a “steam shock”—forcing the pudding to climb the sides of the tin.
The process starts long before the batter hits the pan. First, the batter itself needs to rest. According to Jamie Oliver’s Yorkshire pudding technique, this requires a minimum of 30 minutes on the counter, or even overnight in the fridge. This allows the gluten to relax and the starch granules to fully hydrate, resulting in a more tender pudding and a better rise. While the batter rests (and chills, if made ahead), the fat—be it beef drippings for ultimate flavour or a neutral oil—must be preheated in the pudding tin in a very hot oven until it is not just hot, but literally smoking. This is non-negotiable.
Here are the critical steps for success:
- Rest the Batter: Give your batter a minimum of 30 minutes to rest at room temperature. For even better results, make it the night before and store it in the fridge.
- Heat the Fat: Pour a little beef dripping or vegetable oil into each compartment of a muffin tin and place it in a very hot oven (around 425°F / 220°C) until the fat is smoking.
- Pour with Confidence: Carefully remove the hot tin from the oven and, working quickly, pour the cold batter into the smoking-hot fat. It should sizzle and spit immediately.
- Do Not Disturb: Return the tin to the oven immediately and, most importantly, do not open the oven door for at least 20 minutes. A drop in temperature will cause them to collapse instantly.
By understanding that the magic lies in the violent meeting of cold and hot, you can guarantee sky-high, crispy, and delicious puddings every single time.
Potatoes vs Carrots: When to Add Veggies to the Roasting Pan?
A perfect Sunday roast is an exercise in timing, and nowhere is this more evident than with the roasted vegetables. The common mistake is to throw all the veg into the pan at the same time as the meat, resulting in a chaotic mix of mushy carrots, burnt parsnips, and undercooked potatoes. The secret to perfectly roasted vegetables, each one caramelised and tender, is to understand that different vegetables cook at vastly different rates. They must be added to the roasting pan in stages, according to their density and water content. Thinking of your roasting pan as a timeline is the key to success.
Hard, dense root vegetables like potatoes, carrots, and parsnips need the longest cooking time. They should go into the hot pan at the very beginning, often alongside the meat itself, to give them a full 60 to 80 minutes to become tender on the inside and beautifully caramelised on the outside. Medium-density vegetables, such as onions and Brussels sprouts, require less time and should be added about halfway through the cooking process. Finally, soft, high-water-content vegetables like bell peppers, courgettes, or tomatoes need only 15-20 minutes and should be added in the final quarter of cooking to prevent them from turning into a soggy mess.
The Professional Technique for Perfect Roast Potatoes
Jamie Oliver’s method for roast potatoes showcases a crucial professional step: par-boiling. The potatoes are boiled for 10 minutes until their edges begin to soften. After being drained thoroughly, they are shaken vigorously in the colander or pot. This action fluffs up the exteriors, creating a huge surface area of rough, starchy edges. When these potatoes are roasted in preheated duck fat or oil at a high temperature, those roughened surfaces transform into an incredibly crispy, crunchy crust, while the inside remains perfectly light and fluffy—the hallmark of a restaurant-quality roast potato.
The following table provides a general timeline for roasting common vegetables, helping you plan your additions to the pan for perfect results across the board.
| Vegetable Category | Examples | Roasting Time | When to Add |
|---|---|---|---|
| Hard/Dense | Potatoes, Carrots, Parsnips | 60-80 minutes | Start of cooking |
| Medium | Onions, Brussels Sprouts | 30-40 minutes | Halfway through |
| Soft/High-Water | Bell Peppers, Tomatoes | 15-20 minutes | Final quarter |
This thoughtful approach to timing ensures every element on the plate is cooked to perfection, contributing to a truly memorable roast dinner.
How to Store Roast Beef to Ensure Moist Sandwiches on Monday?
The joy of a Sunday roast often extends to the next day in the form of delicious leftover sandwiches. However, the difference between a dry, disappointing sandwich and a succulent, flavourful one lies entirely in how the leftover meat is stored. The biggest mistake is to slice the entire joint before putting it in the fridge. Slicing exposes a massive amount of surface area to the dry, cold air of the refrigerator, guaranteeing that the meat will be tough and tasteless by Monday lunchtime. The secret to moist leftovers is to protect the meat from moisture loss at all costs.
The best practice is to keep the leftover portion of the roast as a whole, unsliced joint. Allow it to cool completely, then wrap it tightly in foil or plastic wrap before refrigerating. This minimalist approach is the most effective way to retain its internal moisture. If you do have leftover slices, don’t just store them in a container. The professional trick is to submerge them completely in leftover gravy or a good quality beef broth before sealing them in an airtight container. The liquid acts as a protective barrier, keeping the meat incredibly moist and infusing it with even more flavour.
When it comes to using the leftovers, another key tip is to slice the meat cold, directly from the fridge. Cold meat is firmer, allowing you to get much thinner, cleaner slices without shredding the joint. This not only makes for a better sandwich but also helps the meat retain what little moisture is left. Following these steps ensures your Monday sandwiches are something to look forward to, not a sad reminder of the previous day’s feast. Proper storage is key, and food safety guidelines indicate that Sunday roast components can be kept for up to 4 days in the refrigerator, provided they are stored correctly in separate airtight containers to maintain their quality and safety.
- Keep it Whole: Store leftover roast as an unsliced joint, wrapped tightly in foil.
- Submerge Slices: If you have slices, store them submerged in leftover gravy or beef broth in an airtight container.
- Refrigerate Promptly: Store all leftovers in the fridge for up to 4 days.
- Slice Cold: Always slice the meat thinly as needed, directly from the cold joint, for the best texture and moisture retention.
This thoughtful aftercare is the final step in honouring the effort and quality of your magnificent roast dinner.
Direct vs Indirect Heat: The Setup for Grilling Whole Chicken
While the classic Sunday roast is an oven-based affair, the core principles of roasting can be brilliantly applied to an outdoor grill, infusing the meat with a delicious, smoky flavour. The secret to successfully “roasting” a whole chicken or a joint of beef on a barbecue is to move beyond simple grilling and embrace the concept of indirect heat. Grilling over direct heat (placing the food directly above the coals or lit burners) is perfect for searing steaks or sausages, but it would quickly incinerate the outside of a whole chicken while leaving the inside raw. Indirect heat turns your grill into an outdoor convection oven.
The technique involves creating a “two-zone fire.” On a charcoal grill, this means banking all the hot coals to one side, leaving the other side empty. On a gas grill, you simply turn on the burners on one side and leave the other side off. This setup gives you a hot zone for searing and a cooler, oven-like zone for the main cooking phase. The process is straightforward: first, you sear the chicken over the direct, high heat for a few minutes per side to develop a crispy skin and deep brown colour (the Maillard reaction at work). Then, you move the chicken to the cooler, indirect side of the grill, close the lid, and let it cook through gently with convective heat, just as it would in your kitchen oven.
This two-zone method is the cornerstone of successful outdoor roasting. It gives you the best of both worlds: the intense, flavour-building char of direct grilling and the gentle, even cooking of roasting. The trapped heat circulating inside the lidded grill ensures the chicken cooks through to a safe internal temperature without any risk of burning. This approach, as detailed in guides like The Great British Roast, allows you to produce a perfectly moist, evenly cooked bird with the added, irreplaceable bonus of a subtle, smoky aroma that an indoor oven simply cannot provide.
It’s a versatile technique that applies the timeless logic of the Sunday roast to a different cooking environment, with spectacular results.
Why Slicing Lean Steak Immediately Ruins the Texture?
The principle of resting is not exclusive to large roasting joints; it is just as critical, if not more so, for a perfectly cooked steak. Whether it’s a sirloin, fillet, or rump, the same science applies. The intense heat of the pan or grill causes the muscle fibres to contract tightly, pushing moisture to the centre. Slicing into a steak straight from the pan is an act of culinary sabotage. All the flavourful juices that should be in the meat will pour out onto your plate, leaving you with a steak that is dry, chewy, and a shadow of its potential. Resting allows those juices to be reabsorbed, ensuring every bite is succulent and tender.
The required resting time is proportional to the cooking time and the thickness of the cut. For a typical steak, Chef Billy Parisi recommends a simple rule where you should rest it for at least 5 minutes, or for half of its total cooking time for thicker cuts. This allows the internal temperature to equalise and the muscle fibres to relax. A fantastic professional technique for leaner cuts is the “reverse sear.” Instead of searing first, you cook the steak low and slow in a 225°F (110°C) oven until it’s about 10°F below your desired final temperature. Then, after a brief rest, you sear it for 60-90 seconds per side in a smoking-hot cast-iron skillet to create a perfect crust. This method provides incredibly even cooking and a very tender result.
The steps for a reverse sear are simple and highly effective:
- Cook Low and Slow: Place the steak in a low oven (225°F / 110°C) and cook until it is 10-15°F below your target internal temperature.
- Rest and Heat: Remove the steak from the oven and let it rest while you heat a cast-iron skillet over high heat until it’s smoking hot.
- Sear for Crust: Sear the steak in the hot pan for just 60-90 seconds per side to develop a deep, brown crust, then give it one final, brief rest before slicing.
Whether it’s a 4kg roast or a 250g steak, the principle of resting is a non-negotiable law of good meat cookery.
Key Takeaways
- Resting is Non-Negotiable: Always rest your meat after cooking to allow juices to redistribute, ensuring a moist and tender result.
- Fond is Flavour: The dark, sticky bits in the bottom of the roasting pan are the secret to a rich, deep gravy. Never wash them away.
- Temperature Contrast is Key: For high-rising Yorkshire puddings and crispy roast potatoes, the contrast between cold food and very hot fat is essential.
How to Assemble a Thanksgiving Platter That Stays Hot and Looks Professional?
The final, frantic moments before serving a large roast dinner, whether it’s for Thanksgiving or a Sunday family gathering, are often the most chaotic. The great challenge is getting every element—the meat, potatoes, various vegetables, and gravy—onto the table while everything is still piping hot. The secret used by every professional kitchen is not about speed; it’s about creating a “holding zone” and using pre-heated serviceware. Serving beautifully cooked hot food onto cold plates is the fastest way to a lukewarm meal and a disappointed table.
Your home oven can easily become this professional holding zone. Once the meat is out and resting, and the Yorkshire puddings are cooked, turn your oven down to its lowest possible setting (usually around 170°F / 75°C). This gentle heat is perfect for holding your roasted vegetables and other cooked accompaniments without them continuing to cook or dry out. This frees you up to focus on making the gravy without everything else going cold. This single step transforms the final minutes from a frantic rush into a calm, controlled assembly.
The second part of the secret is equally simple but just as crucial: heat your plates and serving platters. Ten minutes before you’re ready to serve, place your main serving platter for the meat and all the dinner plates into this warm oven. When you carve the beautifully rested meat, it goes onto a warm platter. When you serve your guests, the hot food lands on a warm plate. This simple act of thermal management dramatically extends the time that the food stays at its ideal temperature, ensuring that the last bite is just as enjoyable as the first.
The Professional Kitchen’s Holding Zone Strategy
Professional chefs have revealed their simple but effective secret: setting the oven to its lowest temperature (around 170°F/75°C) creates a ‘holding zone’. This space keeps completed dishes perfectly hot while final preparations, like making the gravy, are finished. Furthermore, placing serving platters and dinner plates in this warm oven for 10 minutes before plating is a non-negotiable restaurant technique. It ensures that hot food is never shocked by a cold plate, keeping the entire meal at the perfect temperature from kitchen to table.
Now you have the chef’s secrets. It’s time to preheat the oven, gather the family, and reclaim the Sunday roast as the undeniable, delicious highlight of your week.