The belief that a messy éclair is merely a decoration error is wrong; it is a sign of a fundamental structural and chemical failure.
- The “double dip” or hesitant glazing motion creates waves and ridges, ruining the smooth surface.
- Incorrect fondant temperature—even by a few degrees—prevents proper sugar crystallization, resulting in a dull or runny finish.
Recommendation: Treat your éclair not as a pastry to be decorated, but as an engineered structure where every component, from the pastry cream’s density to the glaze’s precise temperature, serves a critical function.
You have baked a batch of beautiful, golden choux shells. They are hollow, crisp, and ready. You fill them with a luscious crème pâtissière. Now comes the final, defining moment: the glaze. You dip the first éclair, and it comes out with ripples, drips, or a dull, sad finish. It looks clumsy, nothing like the jewel-like creations in a Parisian pâtisserie. The frustration is immense. It feels like you have failed at the very last step. Many home bakers believe this is a simple problem of unsteady hands or a bad recipe.
The common advice is to “be careful” or “use a good quality chocolate.” This is insufficient. It ignores the underlying physics and chemistry that govern the perfect glaze. An éclair is a system. Its final appearance is not an afterthought but the direct result of a series of controlled processes. The messy glaze is not the problem; it is the symptom of a breakdown in that system, whether it’s in the application technique, the temperature of the fondant, or even the structural integrity of the choux pastry itself.
But what if the secret was not in having the hands of a surgeon, but the mind of an engineer? This is the professional approach. We will move beyond vague instructions and dissect the precise science behind a flawless finish. The key is not to decorate the éclair, but to understand its architecture. It is about controlling variables: the motion, the temperature, and the internal structure that supports it all.
This guide will deconstruct the process, moving from the external glazing technique to the internal mechanics of the pastry. We will analyze why certain methods fail and provide the exact, quantifiable parameters professionals use to achieve consistent, perfect results. Prepare to stop decorating and start engineering.
Summary: The Common Glazing Mistake That Makes Chocolate Éclairs Look Messy and Amateur
- The “Double Dip” vs “Single Swipe”: Which yields a Smooth Top?
- Why Fondant Must be 35°C to Shine but not Run?
- How Thick Should Pastry Cream Be to Support the Éclair Structure?
- How to Store Filled Éclairs so the Choux Stays Crisp?
- Coffee vs Chocolate Filling: How to Adjust Sugar Levels?
- Nylon vs Disposable: Which Piping Bag Gives You More Control?
- Mirror Glaze vs Simple Ganache: Which Finish is More Stable?
- Why Your Choux Pastry Collapses After Baking and How to Dry It Properly?
The “Double Dip” vs “Single Swipe”: Which yields a Smooth Top?
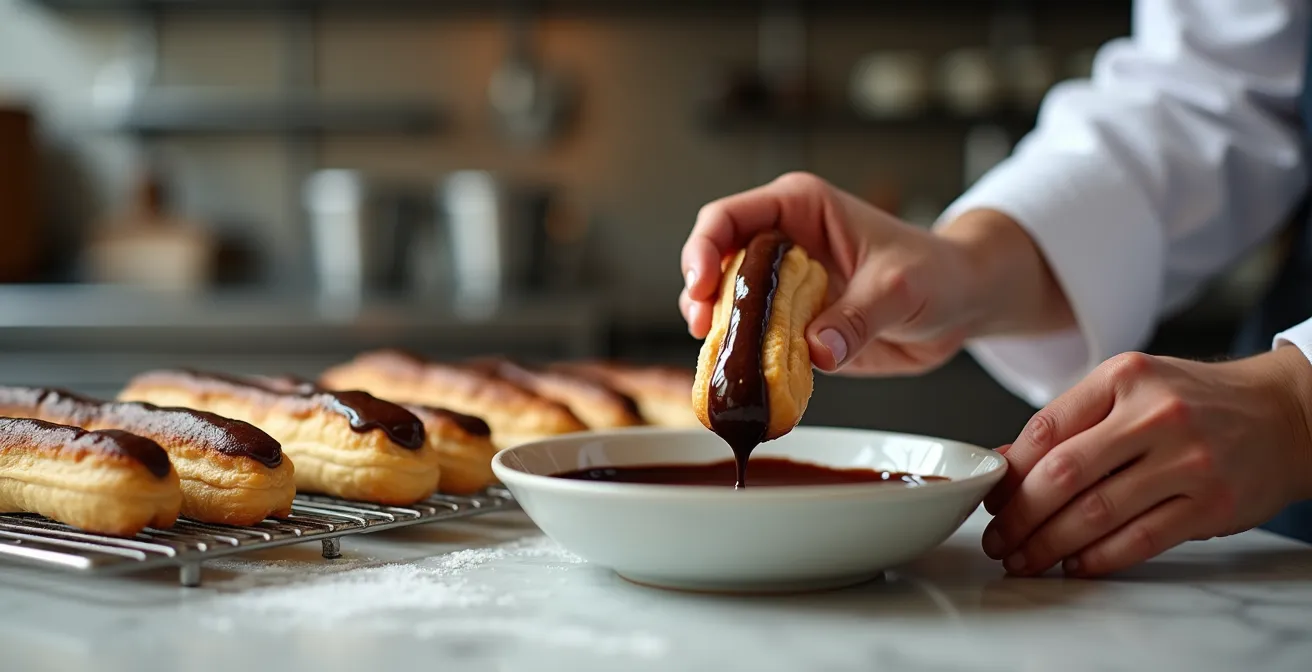
The most common mistake an amateur makes is hesitation. A tentative dip, a second pass to “fix” a bare spot, or a slow withdrawal from the glaze creates a “glaze wave” effect. This is the amateur finish. The professional finish is achieved not by dipping, but by executing a single, confident, and swift motion: the single swipe. The goal is to apply a perfectly even layer of glaze in one movement, using physics to your advantage.
To do this, you must hold the filled éclair horizontally. Entering the glaze at a shallow, 45-degree angle prevents air from being trapped under the éclair, which would create bubbles on the surface. You dip to the midline of the choux shell in one fluid motion, then exit with a sharp upward flick of the wrist. This action uses shear force to cleanly cut the flow of the glaze, leaving a sharp, clean line and preventing drips. A second dip will only disrupt the first layer of setting glaze, creating unsightly ridges and a thick, cloying mouthfeel.
As you can see in this microscopic view, the double dip causes the layers of glaze to slide over one another, creating waves and destroying the mirror-like potential of the surface. Any minor imperfection from the single swipe should be smoothed immediately with a clean finger while the glaze is still liquid. As the renowned pâtissier Christophe Adam emphasizes, this entire process must happen only after the éclairs have cooled completely to prevent the heat from the choux from melting the glaze and making it too thin.
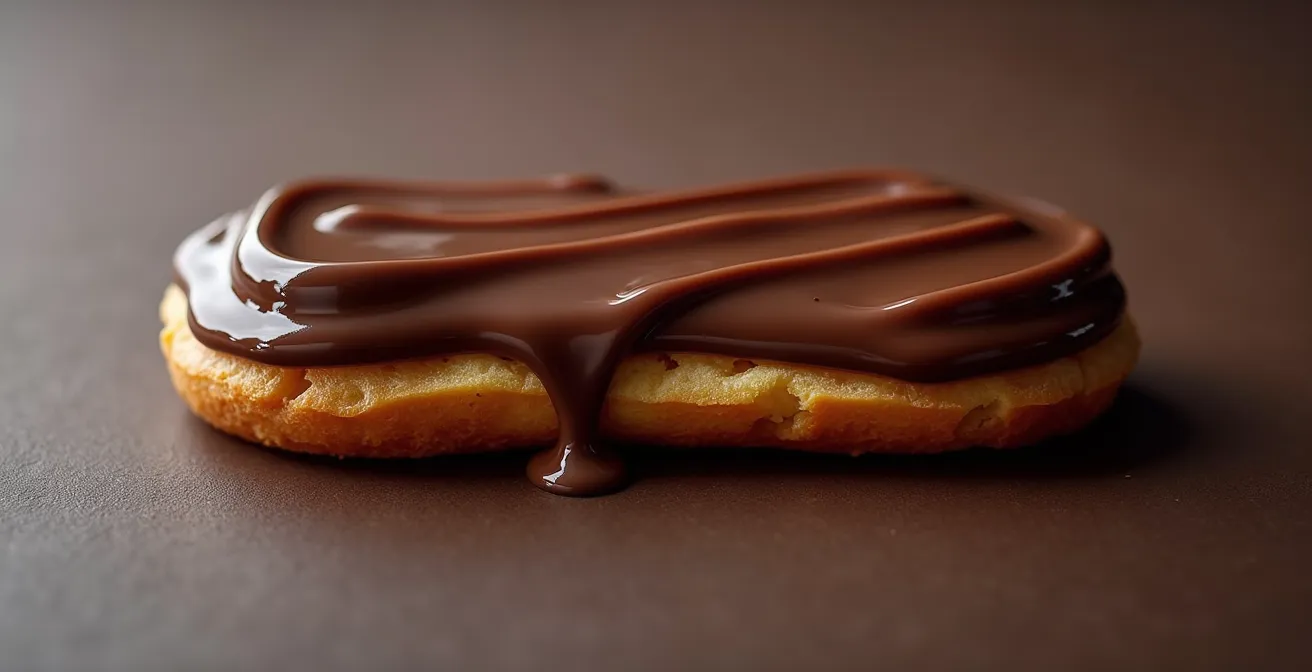
Why Fondant Must be 35°C to Shine but not Run?
A flawless glaze is a matter of chemistry, specifically the science of sugar crystallization. The mirror-like shine on a professional éclair is not from an ingredient, but from controlling temperature with extreme precision. Fondant is a supersaturated solution of sugar. Its final texture and appearance are determined by the size of the sugar crystals that form as it cools. For a high-gloss finish, you need microscopic, uniform crystals that reflect light evenly. This only happens within a very narrow temperature window.
According to professional pastry techniques, that critical window for poured fondant is between 35–40°C (95–104°F). If the fondant is too cold (below 35°C), the sugar crystallizes too quickly and in large, irregular shapes, resulting in a dull, matte, or grainy surface. If it is too hot (above 40°C), the fondant is too fluid; it will run off the éclair, creating a thin, translucent layer that fails to set properly and loses its shine. The target is the perfect balance of fluidity for application and viscosity for setting.
This is not a guideline; it is a law of pastry physics. Using an accurate digital thermometer is non-negotiable. The effects of even a few degrees’ deviation are stark and immediate, as this analysis shows.
| Temperature | Visual Result | Texture | Professional Assessment |
|---|---|---|---|
| Below 35°C | Dull, matte finish | Thick, difficult to spread | Crystals form too quickly |
| 35-38°C | Glossy, mirror-like shine | Perfect flow and coverage | Optimal dipping temperature at no more than 100°F (38°C) |
| Above 40°C | Thin, translucent | Runny, won’t set properly | Fondant loses its shine when overheated above 104°F (40°C) |
To maintain this temperature, work with small batches of fondant in a bowl set over a bain-marie of warm (not hot) water, monitoring the temperature constantly. This control is the true secret behind the impeccable shine of a pâtisserie éclair.
How Thick Should Pastry Cream Be to Support the Éclair Structure?
The crème pâtissière is not merely a delicious filling; it is a critical structural component. A common failure is a pastry cream that is too thin. This leads to two problems: it will begin to leak water, making the choux shell soggy from the inside out, and it will fail to provide the necessary internal pressure to support the delicate, hollow structure. An éclair with a weak filling can sag or even collapse under the weight of its own glaze. The cream’s consistency must be engineered for stability.
The ideal pastry cream should be thick enough to hold its shape on a spoon, yet still be pipeable. When you pipe it into the shell (professionally done through three small holes on the underside, not one large hole on top), it must fill the cavity completely. You should feel a slight resistance as the cream fills the space, providing a firm core. This is what gives the éclair its satisfying heft and structural integrity. A properly made cream has enough gelatinized starch and coagulated egg protein to bind water securely, preventing sogginess.
This concept of the filling as a structural element is a core tenet of modern pâtisserie. As explained by one of the world’s leading pastry chefs:
The pastry cream acts as an internal scaffolding system that prevents the delicate choux shell from collapsing under the weight of the glaze.
– Christophe Adam, L’École Valrhona Professional Pastry Techniques
This is why éclairs are best served within a few hours of filling. The “scaffolding” is at its strongest, and the contrast between the crisp shell and the rich, custardy interior is at its peak. Your pastry cream is not just flavor; it is architecture.
How to Store Filled Éclairs so the Choux Stays Crisp?
You have built a perfect éclair: a crisp shell, a firm filling, and a glossy glaze. The final challenge is preservation. The single greatest enemy of choux pastry is moisture, and the refrigerator is a high-humidity environment. Placing a perfectly crisp éclair in a sealed container is a guarantee for a soft, soggy pastry within hours. Condensation, the sworn enemy of crispness, will form and be absorbed directly by the shell.
The professional solution is counter-intuitive: store them uncovered in the refrigerator. This allows air to circulate, preventing condensation from forming on the glaze and, most importantly, on the bottom of the éclair. To facilitate this, they should be placed on a cooling rack, not a flat plate. This elevation allows air to flow all around the pastry, maintaining the structural integrity of the choux. Covering with plastic wrap is strictly forbidden as it traps moisture and creates a miniature steam room.
While this method preserves crispness, it does have a time limit. A filled éclair is a temporary creation. Professionals know that they are best enjoyed the day they are assembled, with many sources recommending a maximum storage time of up to 24 hours. After this, even with perfect storage, moisture from the crème pâtissière will inevitably begin to migrate into the shell. The goal of storage is not to make them last forever, but to maximize their quality for a short period.
Your Action Plan: Professional Storage for Maximum Crispness
- Place filled and glazed éclairs on a wire cooling rack, ensuring space between each one for air circulation.
- Put the entire rack, uncovered, into the refrigerator. Never use plastic wrap, foil, or a sealed container.
- Check for any moisture sources in the refrigerator; store away from uncovered liquids or high-moisture produce.
- For advanced moisture control in a professional setting, place a food-safe silica gel packet on the shelf below the éclairs.
- Before serving, allow the éclairs to sit at room temperature for 10-15 minutes. This “tempering” step takes the chill off the glaze and cream, improving flavor and texture.
Coffee vs Chocolate Filling: How to Adjust Sugar Levels?
An advanced beginner must learn not just to follow a recipe, but to adapt it. A common adaptation is changing the flavor of the crème pâtissière, for example from chocolate to coffee. However, one cannot simply substitute cocoa powder for coffee extract. This change fundamentally alters the chemistry of the cream, and the base recipe must be re-engineered to compensate. Coffee extract is primarily water-based, whereas cocoa powder contains fat and starch.
Introducing more water (from the coffee extract) into the pastry cream increases water activity, which can lead to a shorter shelf life and a higher risk of the cream weeping. To counteract this, a professional pâtissier increases the sugar content. Sugar binds with free water molecules, controlling this activity and creating a more stable emulsion. Furthermore, the bitterness and acidity of coffee must be balanced. This often requires not only more sugar but also additional fat, typically from extra butter or an additional egg yolk, to restore the rich mouthfeel that is lost when removing the cocoa solids.
A professional approach involves adjusting the core ratios of the recipe. A particularly advanced technique for coffee-flavored creams is the addition of a small amount of invert sugar (like trimoline). This type of sugar is highly effective at preventing crystallization and retaining moisture, resulting in a coffee cream that is exceptionally smooth and stable, perfectly mimicking the texture of its chocolate counterpart.
| Component | Chocolate Cream Base | Coffee Cream Adjustment | Reason |
|---|---|---|---|
| Sugar | 100g per 500ml milk | +20g additional | Coffee’s water content requires more sugar for water activity control |
| Butter | 50g standard | +10g additional | Extra fat balances coffee’s acidity |
| Egg Yolks | 4 yolks | 5 yolks | Additional protein for structure |
| Flavoring | 2 tbsp cocoa powder | Coffee extract to taste | Substitute coffee extract for cocoa powder depending on desired strength |
This demonstrates that changing one ingredient has a cascading effect. True mastery is understanding these relationships and adjusting the formula accordingly to maintain both structural integrity and flavor balance.
Nylon vs Disposable: Which Piping Bag Gives You More Control?
The consistency of your éclairs begins the moment you pipe the choux. Unevenly sized or shaped shells will be impossible to glaze uniformly. While skill is paramount, the choice of tool has a significant impact on control and precision. The debate between disposable plastic bags and reusable nylon bags is not just about convenience; it is about performance and tactile feedback.
For maximum control, a reusable nylon piping bag is superior. The material is less flexible and less slippery than thin disposable plastic. This provides two distinct advantages. First, the slightly textured surface of the nylon offers a much better grip, reducing hand fatigue and preventing slippage during long piping sessions. Second, the thicker material provides a more direct 1:1 pressure transfer. When you squeeze, the force is transmitted directly to the pastry without the bag itself stretching or distorting. This allows for more subtle and immediate control over the flow of the choux paste.
However, the bag is only part of the system. Control is frequently lost due to two other factors:
- The Coupler: A loose or poorly fitted coupler is a primary cause of lost control, allowing the paste to leak and pressure to drop inconsistently.
- The Tip Size: Using the correct piping tip (typically a large French star tip or plain round tip for éclairs) is critical. A tip that is too small requires excessive pressure, leading to shaky lines and bursting bags.
While disposable bags offer easy cleanup, they are a false economy for anyone serious about consistency. They are prone to stretching under pressure and can become very slippery when coated with even a small amount of grease from the butter in the choux. Investing in a quality nylon bag is an investment in control and, ultimately, in a more professional final product.
Mirror Glaze vs Simple Ganache: Which Finish is More Stable?
While fondant is the classic French finish, many bakers consider other glazes like simple ganache or a mirror glaze. The choice is not just aesthetic; it is a strategic decision based on the desired stability of the final product. Each glaze has a different chemical structure and behaves differently under varying conditions of temperature and humidity.
A mirror glaze, which is based on gelatin, offers supreme temperature stability once it is set. The gelatin creates a firm gel that holds its shape and high gloss even at a warm room temperature, making it ideal for buffets or situations where refrigeration is inconsistent. However, it is far less forgiving in application, requiring the product to be frozen and the glaze itself to be at a precise temperature. It is also hygroscopic, meaning it attracts water, and can be prone to “sweating” in high humidity. Once set, a mistake is permanent; it cannot be repaired.
A simple ganache, which is an emulsion of chocolate and cream, is an entirely different structure. It is essentially a fat-based emulsion, making it hydrophobic—it naturally repels moisture and performs better in humid environments than a mirror glaze. Its main weakness is temperature; as a fat-based system, it will soften and melt at room temperature, losing its shape and shine. However, it offers tremendous “process stability.” It is far more forgiving to apply. As noted by culinary experts, adding a bit of corn syrup to a ganache can enhance its shine and a gentle pass with a warm palette knife can smooth over imperfections, something impossible with a set mirror glaze. You can learn more about this technique from professionals who suggest it’s forgiving to apply with corn syrup for shine.
The choice is a trade-off: mirror glaze offers superior post-application stability at the cost of high application difficulty. Ganache offers superior application stability and repairability at the cost of lower temperature resistance. For a beginner advancing their skills, a well-made ganache is often a more reliable choice than a poorly executed mirror glaze.
Key Takeaways
- A perfect éclair is an engineered system where every component serves a structural purpose.
- Glaze shine is a function of sugar crystallization, controlled by a precise temperature of 35-38°C.
- The pastry cream is not just a filling; it is an internal scaffold that supports the choux shell.
- Choux pastry’s structure is a two-part process: starch gelatinization on the stove and protein coagulation in the oven.
- Moisture is the enemy of crispness. Store éclairs uncovered on a rack in the refrigerator to allow for air circulation.
Why Your Choux Pastry Collapses After Baking and How to Dry It Properly?
All the work on glaze and filling is wasted if the foundation—the choux pastry—is flawed. A collapsed, flat, or soft choux shell is the most fundamental failure in éclair making. This collapse is almost always due to a weak structure caused by insufficient drying. The magnificent puff of choux pastry is created by steam; the permanent structure is created by cooking the proteins and starches until they are rigid enough to hold that shape once the steam dissipates.
The creation of a stable choux shell is a two-stage process. First is starch gelatinization, which happens on the stovetop when you cook the “panade” (the flour, water, and butter mixture). This thickens the paste and begins building the structure. The second, and more critical, stage is protein coagulation. This happens in the oven. The heat of the oven turns the water in the paste to steam, causing the pastry to puff, while simultaneously cooking the egg proteins until they form a solid, rigid network. If you remove the éclairs from the oven before this network is fully set, the internal steam will condense, and the weak walls will collapse in on themselves.
To prevent this, you must bake until the shells are a deep, uniform golden brown—not pale. Paleness is a sign that the structure is not yet fully cooked and rigid. Once they reach this color, the professional technique is to turn off the oven, prop the door open slightly with a wooden spoon, and let the éclairs dry inside the cooling oven for 10 to 15 minutes. This crucial drying phase allows the last of the internal moisture to escape slowly, fully solidifying the protein and starch structure and ensuring a crisp, hollow, and incredibly stable shell that will not collapse on the cooling rack.
The path to the perfect éclair is not in finding a magic recipe, but in mastering these foundational principles. Apply this engineering mindset to your next batch and observe the radical difference in your results.