Perfect roasting isn’t about following a recipe; it’s about controlling heat transfer and chemical reactions.
- Steam, caused by overcrowding your pan, is the number one enemy of browning. Maximizing dry air contact is the primary goal.
- Your oven’s temperature dial is an approximation at best. Managing heat zones and increasing thermal mass are the real secrets to even cooking.
Recommendation: Treat your oven like a laboratory. Master pan spacing, rack position, and oil chemistry to guarantee deeply caramelized results every time.
You’ve followed the advice. You cranked the oven to 425°F, tossed your vegetables in oil, and spread them on a baking sheet. Yet, forty minutes later, you’re greeted not with the deeply browned, sweet, and nutty morsels you dreamed of, but with a pan of limp, waterlogged, and sadly pale vegetables. It’s a common frustration for any health-conscious cook. Why, despite your best efforts, do your vegetables steam instead of roast?
Most guides will tell you the basics: use high heat, don’t overcrowd the pan, and cut everything to the same size. While true, this advice barely scratches the surface. It tells you the “what” but completely ignores the “why.” The real difference between soggy failure and caramelized success doesn’t lie in a secret recipe but in understanding the fundamental physics and chemistry at play inside your oven. It’s about manipulating the thermodynamics of flavor.
This guide reframes your kitchen as a laboratory. We’re going to move beyond generic tips and delve into the science of non-enzymatic browning. Forget expensive new equipment; the most powerful tool you have is knowledge. We will explore how to manage surface moisture evaporation, why your choice of oil impacts the Maillard reaction, and how to turn your oven’s inconsistencies from a liability into an asset. By understanding these core principles, you can achieve consistently perfect, deeply flavorful roasted vegetables, every single time.
This article deconstructs the roasting process into its scientific components, giving you the control to troubleshoot and perfect your technique. Explore the sections below to master each variable in your culinary experiments.
Summary: A Scientific Guide to Caramelized Vegetables
- Why Overcrowding Your Sheet Pan Turns Roasting into Steaming?
- Olive Oil vs Avocado Oil: Which Withstands 400°F Roasting Best?
- The Rack Position Mistake That Burns Your Cookies but Leaves Tops Pale
- How to Roast Root Vegetables and Soft Squash on the Same Pan?
- Convection Mode: When to Use It for Roasting and When to Avoid It?
- Potatoes vs Carrots: When to Add Veggies to the Roasting Pan?
- Oven Charring: How to Mimic the “Bark” of Brisket in a Conventional Oven?
- Why Your Oven Temperature Varies by 20 Degrees and How to Fix It?
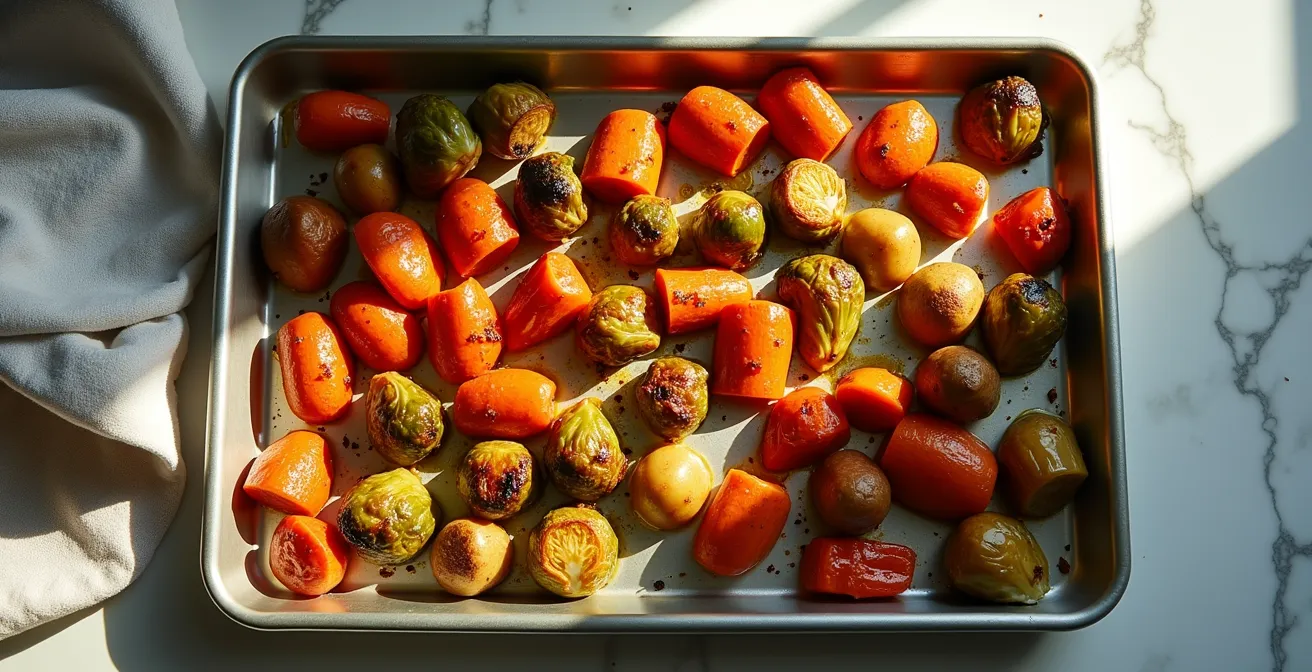
Why Overcrowding Your Sheet Pan Turns Roasting into Steaming?
The single greatest saboteur of crispy roasted vegetables is excess moisture. When you pile vegetables onto a baking sheet, you’re not just limiting their contact with the hot metal; you are creating a micro-environment of steam. As vegetables heat up, they release water. In a crowded pan, this water has nowhere to evaporate and turns into steam. This steam hovers over the surface of the vegetables, effectively lowering the temperature they experience and preventing the two crucial chemical reactions for browning: the Maillard reaction (for proteins and sugars) and caramelization (for sugars).
Roasting is, by definition, a dry-heat cooking method. Steaming is a wet-heat method. To achieve the deep, complex flavors we want, the surface of the vegetables must be dry enough to exceed the boiling point of water (212°F / 100°C). In fact, research shows the ideal roasting temperature range is 400°F to 425°F (200°C to 220°C). This high, dry heat is impossible to achieve in a cloud of steam. To ensure you’re roasting, not steaming, follow these principles:
- Give them space: Spread vegetables in a single, even layer with visible breathing room between each piece. A good rule of thumb is to ensure you can still see at least 20% of the pan’s surface.
- Use multiple pans: If your vegetables don’t fit in a single layer on one pan, don’t force it. It is always better to use two half-full pans than one overflowing pan.
- Never cover the pan: Covering vegetables with foil while roasting is the fastest way to trap steam and guarantee a soggy outcome. Save the foil for other applications.
By ensuring hot, dry air can circulate freely around each piece, you facilitate rapid surface moisture evaporation, setting the stage for perfect browning.
Olive Oil vs Avocado Oil: Which Withstands 400°F Roasting Best?
Fat is not just for preventing sticking; it’s a critical medium for heat transfer. A coating of oil ensures the vegetable surfaces make better, more even contact with the hot air and pan, leading to more uniform browning. However, not all oils are created equal, especially under the high-heat conditions of roasting. The key factor to consider is the oil’s smoke point—the temperature at which it begins to break down, smoke, and impart a burnt, acrid flavor to your food.
This comparison shows how different oils behave under high heat, helping you choose the right one for your roasting temperature.
| Oil Type | Smoke Point | Best For | Flavor Profile |
|---|---|---|---|
| Extra Virgin Olive Oil | 374-405°F | Lower temp roasting | Fruity, peppery |
| Refined Olive Oil | 465°F | High-heat roasting | Neutral, mild |
| Avocado Oil | 520°F | Very high-heat roasting | Neutral, buttery |
The choice between these popular oils isn’t as simple as picking the one with the highest smoke point. It’s a balance of chemical stability and flavor contribution.
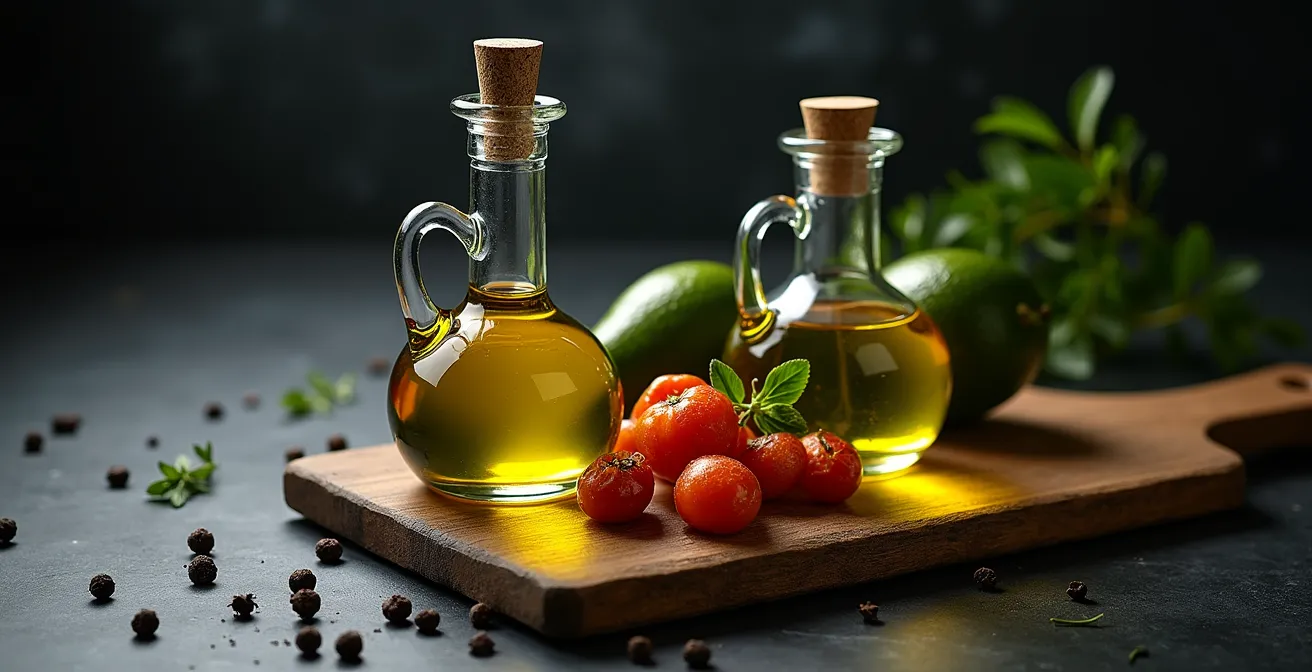
As the visual suggests, these oils have distinct properties. For roasting at 425°F, avocado oil is the clear winner for stability, as its smoke point is well above the cooking temperature. It remains neutral and won’t break down. However, a culinary test highlighted an interesting trade-off: while avocado oil maintained perfect stability, a majority of taste testers (73%) preferred the flavor imparted by Extra Virgin Olive Oil on Mediterranean vegetables, even with slight degradation. This shows that for shorter roasting times or if you value flavor over absolute stability, a good quality EVOO can still be a viable, and delicious, choice.
The Rack Position Mistake That Burns Your Cookies but Leaves Tops Pale
Your oven is not a uniformly heated box; it’s a dynamic environment with distinct heat zones. Mastering rack position means controlling the type of heat your food receives. As the California Grown Editorial Team notes in their guide, this is a critical skill for any home cook.
Understanding the three types of heat in an oven – conductive from the pan, convective from the air, and radiant from the heating elements – is crucial for perfect roasting.
– California Grown Editorial Team, California Grown Roasting Guide
Each rack position emphasizes a different type of heat transfer. The top rack receives intense radiant heat from the upper heating element, perfect for browning and charring tops. The bottom rack gets powerful radiant heat from below and direct conductive heat from contact with the oven floor or lower element shield, ideal for crisping bottoms. The middle rack is the zone of convective heat, where hot air circulates most evenly, ensuring thorough, gentle cooking.
The common mistake is treating all racks as equal. A pale top and burnt bottom is a classic sign of using the bottom rack for the entire cooking time. A strategic approach involves using multiple rack positions during a single roast:
- Start on the bottom rack: For the first 15 minutes, use the intense bottom heat to jump-start caramelization and develop a golden-brown crust on the underside of your vegetables.
- Move to the middle rack: For the remainder of the cooking time, transfer the pan to the middle rack. This allows the more gentle, circulating convective heat to cook the vegetables through evenly without burning the bottoms.
- Finish on the top rack (optional): For an extra-charred, blistered finish, move the pan to the top rack and switch on the broiler for the final 60-90 seconds, watching carefully.
This multi-stage approach gives you precise control over the final texture and color, transforming your oven from a simple heater into a versatile cooking tool.
How to Roast Root Vegetables and Soft Squash on the Same Pan?
The dream of a single-pan roasted vegetable medley often ends in a nightmare of burnt zucchini and rock-hard potatoes. The reason is simple: different vegetables cook at vastly different rates due to their density and water content. A dense, starchy root vegetable like a potato requires much more time to become tender than a delicate, water-rich vegetable like a bell pepper or zucchini. Throwing them all in at once is a recipe for uneven results.
The solution is the “staggered entry” method. This technique involves adding vegetables to the roasting pan in stages, from longest-cooking to shortest-cooking. This ensures that every vegetable has the precise amount of time it needs to reach its peak of tender-crisp perfection. This table provides a general guideline for roasting times at 425°F (220°C).
| Vegetable Type | Roasting Time | When to Add |
|---|---|---|
| Beets, Potatoes (quartered) | 30-35 minutes | Start immediately |
| Carrots, Sweet Potatoes | 25-30 minutes | After 5-10 minutes |
| Brussels Sprouts, Broccoli | 20-25 minutes | After 10-15 minutes |
| Bell Peppers, Zucchini | 10-15 minutes | Last 10-15 minutes |
A case study from a Mediterranean kitchen perfectly illustrates this technique’s success. By starting baby potatoes on their own for 10 minutes before adding zucchini, mushrooms, and tomatoes, the chefs achieved a flawless result. The potatoes became perfectly tender with golden-brown edges, while the more delicate vegetables were cooked through but remained crisp-tender without turning to mush or burning. This staggered approach is the key to orchestrating a harmonious, multi-vegetable roast on a single pan.
Convection Mode: When to Use It for Roasting and When to Avoid It?
The convection setting on your oven activates a fan that circulates hot air, fundamentally changing the cooking dynamics. For roasting, this can be a powerful ally. The moving air accelerates surface moisture evaporation, creating a drier environment that promotes faster and more even browning. The result is often crispier vegetables in less time. However, convection is not a one-size-fits-all solution and must be used with intention.
The increased efficiency of convection means you need to adjust your recipes. If you don’t, you risk burnt exteriors and undercooked interiors. The rule of thumb when using convection mode, is a 25°F reduction in temperature or a 25% reduction in cooking time. For example, a recipe calling for 30 minutes at 425°F in a standard oven would be adjusted to 30 minutes at 400°F or about 22 minutes at 425°F on convection.
Knowing when to leverage this feature is key. Convection is your best friend for sturdy vegetables where a crispy exterior is the goal, but it can be a foe to more delicate items. Here’s a quick guide:
- USE convection for sturdy vegetables like potatoes, carrots, and broccoli to achieve a superior crispy finish. A great technique is to start on standard bake for the first half of cooking and switch to convection for the final half.
- AVOID convection for very delicate vegetables like thin asparagus spears, or for high-sugar items like butternut squash, which can dry out or burn on the outside before the inside is tender.
- MONITOR closely when using convection for the first time with a new vegetable. The circulating air can dehydrate food faster than you expect.
Used wisely, the convection setting is a fantastic tool for accelerating the Maillard reaction and achieving that coveted golden-brown crust.
Potatoes vs Carrots: When to Add Veggies to the Roasting Pan?
The classic pairing of potatoes and carrots in a roast is a perfect case study in vegetable chemistry. While they have similar densities, their sugar content creates a timing conflict. As expert Ashley from The Recipe Rebel explains, understanding this difference is crucial.
The high sugar content in carrots means they caramelize faster than potatoes undergo the Maillard reaction. If you add them too early, the sugars will burn before the potatoes are even browned.
– Ashley from The Recipe Rebel, Simple Roasted Vegetables Guide
Potatoes, being starchy, rely primarily on the Maillard reaction for browning, which requires higher heat and more time. Carrots, rich in natural sugars, brown via caramelization, a process that occurs more quickly and at slightly lower temperatures. Adding them at the same time often results in perfectly browned potatoes and sadly blackened carrots. The standard solution is to add the carrots about 10-15 minutes after the potatoes.
However, for the truly obsessed food scientist, there’s a more elegant solution: the dry brine technique. A test kitchen found that by salting cut potatoes and letting them sit for 20-30 minutes before roasting, you can give them a crucial head start. The salt draws surface moisture out of the potatoes, which you then pat dry. This pre-treatment dramatically accelerates the browning process, allowing potatoes and carrots of a similar size to be roasted together from the start and finish at the same time, both perfectly caramelized in about 30 minutes at 425°F. This is a prime example of using a simple scientific principle to solve a common cooking problem.
Key Takeaways
- Overcrowding is the #1 enemy of roasting; it creates steam and prevents the essential browning reactions. Always give your vegetables space.
- Master the three heat types (conductive, convective, radiant) by strategically using different oven rack positions to control browning and even cooking.
- Stagger the addition of vegetables based on their density and use a calibrated, thermally stable oven for consistent, repeatable, and perfectly cooked results.
Oven Charring: How to Mimic the “Bark” of Brisket in a Conventional Oven?
For those looking to push their roasting skills into the realm of artistry, one of the most satisfying techniques to master is creating a savory, dark, and crispy crust, often called a “bark,” similar to what you find on slow-smoked brisket. This “bark” is a complex crust formed by dehydrated proteins, rendered fats, and polymerized spices and sugars. While vegetables lack the fat content of brisket, we can mimic this effect using a combination of sugar, umami, and high, direct heat.
The secret is a two-stage process. First, roast the vegetables until they are tender. Then, introduce a glaze or rub containing sugar and switch to the highest heat setting to rapidly caramelize that sugar into a dark, flavourful crust. This process requires careful attention but yields spectacular results.
Action Plan: Creating a Savory Vegetable ‘Bark’
- Create the Rub: Mix a small amount of brown sugar or maple syrup with spices like smoked paprika and garlic powder. For a deeper, “meaty” flavor, add umami boosters like finely ground mushroom powder or a dash of soy sauce.
- Apply the Mixture: Coat vegetables in oil first to promote heat transfer. Then, toss them in the sugar-spice mixture until evenly coated.
- Roast for Tenderness: Roast at 425°F (220°C) until the vegetables are just tender, typically 20-30 minutes. The initial crust will begin to form.
- Initiate the Char: Move the pan to the top rack of your oven and switch the setting to its highest broil function. This provides the intense, direct radiant heat needed.
- Watch Like a Hawk: Broil for 60 to 120 seconds. The sugar will caramelize and char very quickly. Pull the pan the moment the edges are dark and glossy, just before they turn to carbon.
A test of this technique using a honey-balsamic glaze proved incredibly effective. When applied to roasted vegetables in the final minutes of cooking and then placed under the broiler, the sugars in the honey rapidly caramelized, creating a dark, glossy coating reminiscent of BBQ bark. Brussels sprouts were particularly successful, developing impressive crispy, charred outer leaves while remaining tender inside. This advanced method is a testament to how understanding heat and sugar chemistry can elevate a simple dish to something extraordinary.
Why Your Oven Temperature Varies by 20 Degrees and How to Fix It?
You can follow every technique perfectly, but if your primary tool—the oven—is inconsistent, your results will be too. The temperature you set on the dial is an average, not a constant. To maintain that average, your oven’s heating elements cycle on and off, causing most home ovens to experience ±20-25°F temperature swings. These fluctuations are a major source of inconsistent cooking, leading to vegetables that are burnt in some spots and undercooked in others.
Fortunately, the solution is simple and relies on a basic principle of physics: thermal mass. By placing a large, dense object in your oven, you create a heat reservoir. This object absorbs a massive amount of heat during preheating and then radiates it back slowly and evenly, buffering the temperature swings from the cycling heating elements. This creates a much more stable and predictable roasting environment.
Here’s how to stabilize your oven temperature and map its unique quirks:
- Add Thermal Mass: Place a pizza stone, a heavy-duty baking steel, or a large cast-iron skillet on the bottom rack of your oven.
- Preheat Properly: Always preheat your oven for at least 30 minutes, or even up to an hour if using a thick stone. This gives the thermal mass enough time to become fully saturated with heat.
- Perform the “Bread Test”: To understand your oven’s specific hot and cool spots, arrange slices of plain white bread across a rack and bake for a few minutes. The resulting toast pattern is a perfect map of your oven’s heat distribution. Use this map to place vegetables that need more browning in the hot spots and more delicate ones in the cooler zones.
By investing time in stabilizing and understanding your oven, you are calibrating your most important laboratory instrument. This final step moves you from being a cook who hopes for good results to a scientist who engineers them.
Stop following recipes blindly and start conducting delicious experiments. By treating your oven as a lab and mastering these thermodynamic principles, you have all the tools you need to achieve perfectly caramelized vegetables, every single time.