In summary:
- Adopt a professional caterer’s mindset: focus on “workflow over recipes” by organizing your kitchen into stations.
- Create a reverse timeline (a “T-Minus” schedule) starting from your desired serving time to map out every task.
- Master temperature integrity by pre-warming serving dishes and using methods like a makeshift bain-marie to keep food hot.
- Systematize every element, from batched welcome cocktails to make-ahead dessert components, to minimize day-of-stress.
Hosting a celebratory dinner for ten people should be a joy, a moment of connection filled with laughter and delicious food. Yet, for many hosts, the dream quickly dissolves into a frantic reality of chaotic kitchens, cold side dishes, and the feeling of being a line cook rather than a participant in their own party. You find yourself trapped by the stove, worrying if the potatoes are drying out while the main course gets cold, and by the time you sit down, you’re too exhausted to enjoy the company.
Common advice often revolves around generic tips like “prep in advance” or “choose simple recipes.” While not wrong, this advice misses the fundamental strategy that allows professionals to serve hundreds of hot, high-quality meals seamlessly. The real secret isn’t just about doing things early; it’s about changing your entire approach. It’s about moving beyond a recipe-by-recipe checklist and adopting a logistical framework.
But what if the key wasn’t just *what* you prep, but *how* you structure your entire workflow? This guide will show you how to think like a professional caterer. The core principle is simple but transformative: prioritize workflow over individual recipes. We will shift the focus from a list of dishes to a system of synchronized stations and schedules. This is the strategy that turns kitchen chaos into calm, controlled execution.
Throughout this article, we’ll break down this professional methodology into actionable steps. You’ll learn how to build a reverse-engineered schedule, manage dietary needs without spoiling surprises, choose service styles that protect food temperature, and master the art of preparing components that come together flawlessly at the last minute. Get ready to reclaim your role as a host and finally enjoy your own celebration.
This guide provides a complete logistical framework for your event. Below, you will find a detailed breakdown covering everything from pre-party planning to final, professional-looking assembly.
Summary: A Caterer’s System for Flawless Dinner Parties
- The “T-Minus” Schedule: How to Plan Your Cooking from Serving Time Backward?
- How to Survey Guests for Allergies Without Ruining the Surprise Menu?
- Plated vs Family Style: Which Service Method keeps Food Hotter?
- Pitcher Cocktails: How to Prep Welcome Drinks Before Guests Arrive?
- How to Keep Mashed Potatoes Warm for 2 Hours Without Drying Out?
- How to Build a “Theme Night” Schedule That Reduces Decision Fatigue?
- What Can Be Baked 24 Hours Before Your Tea Party?
- How to Assemble a Thanksgiving Platter That Stays Hot and Looks Professional?
The “T-Minus” Schedule: How to Plan Your Cooking from Serving Time Backward?
The single greatest source of stress for a host is timing. The solution is to abandon a linear to-do list and adopt the “T-Minus” schedule, a reverse timeline used by event planners and caterers. You start with your goal—for instance, “Dinner is served at 8:00 PM”—and work backward, assigning a time slot to every single task. This is the essence of building a workflow over a simple recipe list.
As a former catering chef, I can attest that organizing your work into stations is far more efficient than tackling individual dishes one by one. This approach mirrors professional kitchen systems. You should divide your plan into a cold station (for salads, dressings, cold appetizers), a hot station (for proteins and hot sides), and a plating station (for final assembly and garnishes). This mental shift prevents you from running back and forth and streamlines your movements. According to one professional, the golden rule for portion planning is that adults eat about 1 pound of food total per meal, which helps in scaling recipes accurately for a group of ten.
Here is a practical breakdown of a T-Minus schedule:
- T-8 hours: Wake up, enjoy a coffee, and do a leisurely grocery shop. You can even prep small items like freezing fruit for drinks.
- T-4 hours: This is your main prep window. Chop all vegetables, marinate proteins, and set up your entire drink station.
- T-2 hours: Begin “passive cooking”—dishes that go in the oven and need minimal attention. This is also the perfect time to set the table completely.
- T-60 minutes: Finalize anything for the cold station, like assembling salads. Place your serving platters in a low-temperature oven to warm up.
- T-30 minutes: Begin final “active cooking” for the hot station, like grilling proteins.
- T-15 minutes: Build in a recovery buffer. Use this time for final touches: light the candles, add garnishes, and take a deep breath.
- T-0: Welcome guests with pre-prepared drinks, confident that everything is ready to serve.
This station-based, reverse-engineered schedule is the fundamental system that prevents last-minute panic and ensures every component of the meal is ready simultaneously.
How to Survey Guests for Allergies Without Ruining the Surprise Menu?
Navigating dietary restrictions is a modern hosting requirement, but it doesn’t have to spoil the surprise of a carefully planned menu. The key is to be proactive, discreet, and systematic. A simple, casual message sent one to two weeks in advance is the most effective tool. Avoid asking “Is there anything you don’t eat?” as it invites preferences. Instead, focus on medical necessities.
A party planning expert suggests a clear and gracious script that sets a welcoming tone while gathering critical information. When reaching out, frame the question with warmth and excitement, as a professional host would:
I’m so excited to cook for you! To ensure everyone has a wonderful meal, could you let me know of any serious allergies or dietary restrictions I should be aware of?
– Chrystinanoel.com Party Planning Expert, Party Planning 101: Professional Host Scripts
This phrasing is polite and directs guests to share only crucial information. Once you have the responses, organize them using a triage system to manage your workload. This avoids making unnecessary accommodations for simple dislikes while ensuring the safety of guests with severe allergies. Organizing this information visually, perhaps with elegant note cards, can keep it top-of-mind during preparation.

A systematic approach is crucial to prevent cross-contamination and ensure every guest feels cared for. The goal is to gather data efficiently so you can focus on the creative aspects of cooking, free from the last-minute stress of a dietary surprise.
Your Action Plan: The Dietary Triage System
- Casual Inquiry: Send a text 1-2 weeks ahead asking about serious dietary restrictions, without revealing the full menu.
- Categorize Responses: Triage replies into Anaphylactic/Severe (requires separate prep), Intolerance/Major (needs a substitute version), and Preference (accommodate only if easy).
- Strategic Reveal: Share only a theme or key ingredient, like “We’re planning a cozy autumn-themed dinner,” to prompt relevant allergy disclosures.
- Design a “Safe Haven” Dish: Ensure one of your dishes is naturally free from the top 8 allergens as a built-in safety net.
- Track and Execute: Keep a written chart in the kitchen during prep to meticulously avoid cross-contamination for any severe allergies.
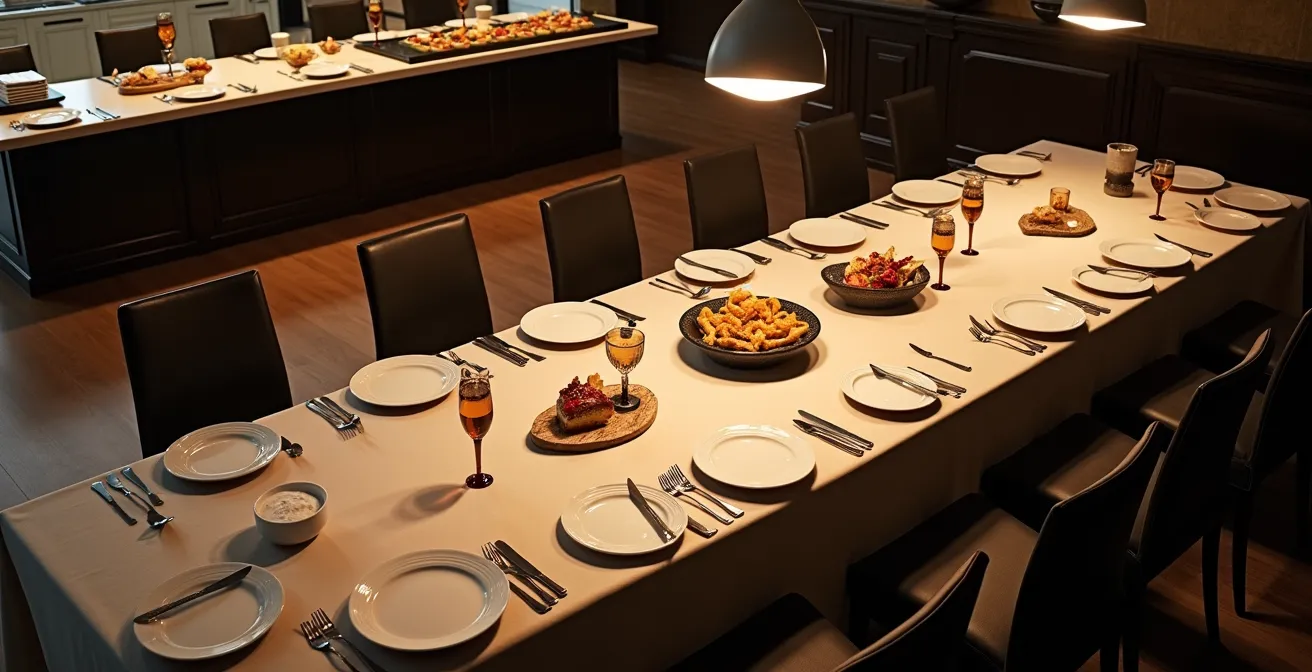
Plated vs Family Style: Which Service Method keeps Food Hotter?
The choice between plated and family-style service is more than an aesthetic one; it’s a critical decision that impacts temperature integrity and your workload as a host. While individually plated meals offer a formal, restaurant-style feel, they present a major logistical challenge for a solo host: keeping ten plates hot during assembly. Family-style service, where guests serve themselves from large platters, is often the superior choice for maintaining heat, especially when there’s a significant distance from the kitchen to the dining table.
An analysis of service styles confirms this. Family-style service offers higher heat retention, provided you use pre-warmed serving dishes. This is a non-negotiable step. Placing your ceramic or glass platters in a low oven (around 200°F/93°C) for 10-15 minutes before plating turns them into mini-radiators, actively keeping the food warm. This technique is far more effective than trying to pre-heat ten individual dinner plates.
One host planning a dinner for 20 people discovered this firsthand. With a kitchen in the basement and a dining room on the second floor, attempting to ferry 20 individual hot plates was a recipe for disaster. They found that family-style service using pre-warmed platters was the only way to ensure food arrived at the table hot. Setting up the buffet or serving area in advance with trivets and utensils was another key to their success.
For a group of ten, a hybrid approach can offer the best of both worlds. Plate the main protein, which is often the most time-sensitive and visually impactful element, and serve the side dishes family-style. This concentrates your plating efforts on one item while ensuring the accompanying starches and vegetables remain hot and abundant in their serving dishes.
The table below breaks down the pros and cons to help you choose the best workflow for your specific setup.
| Service Method | Heat Retention | Host Workload | Best For |
|---|---|---|---|
| Plated Individual | Lower (unless plates pre-heated to 150°F) | One concentrated burst in kitchen | Formal dinners, controlled portions |
| Family Style | Higher with pre-warmed serving dishes | Staggered work, multiple refills needed | Long kitchen-to-table distances |
| Hybrid (Plate protein, sides family-style) | Optimal – protein stays hottest | Balanced workload | Groups of 8-12 people |
| Buffet Style | Good with chafing dishes/warmers | Minimal during service | Very large groups (15+) |
Pitcher Cocktails: How to Prep Welcome Drinks Before Guests Arrive?
A welcome drink is the first signal to your guests that they can relax and settle in. However, playing bartender for the first 30 minutes of your party pulls you away from conversations and adds to your stress. The professional solution is a self-serve, pre-batched pitcher cocktail station. This system not only frees you up but also prevents a traffic jam in the kitchen as guests arrive.
The key to a successful batched cocktail is managing temperature and dilution. A common mistake is using standard ice cubes, which melt quickly and water down the drink. Instead, use large-format ice, like king cubes or a single large ice ring made in a Bundt pan. This drastically slows down the melting process. According to professional bartending guidelines, pre-batched cocktails maintain optimal flavor for up to three hours with only 15-20% dilution when properly chilled and using large ice. To maximize coldness, pre-chill not only all your liquid ingredients but also the pitchers themselves for at least two hours.
Building your welcome bar is a simple but strategic task. Follow these steps to create an effortless and elegant experience for your guests:
- Offer Options: Set up a complete drink station with one alcoholic pitcher cocktail and one non-alcoholic option, like infused water or iced tea.
- Label Clearly: Label each pitcher so guests with preferences or allergies can serve themselves confidently.
- Delay the Fizz: If your cocktail includes sparkling components like prosecco or soda water, mix the base ahead of time but add the bubbles just as the first guest is about to arrive to preserve carbonation.
- Create a Garnish Tray: Set up a small “deconstructed garnish tray” with citrus twists, fresh herbs, or olives. This allows for personalization and adds a touch of class.
- Strategic Placement: Position the drink station away from the main kitchen workflow area to encourage mingling and prevent bottlenecks.
By systemizing your welcome drinks, you execute the first step of your event with professional polish, setting a relaxed and organized tone for the rest of the evening.
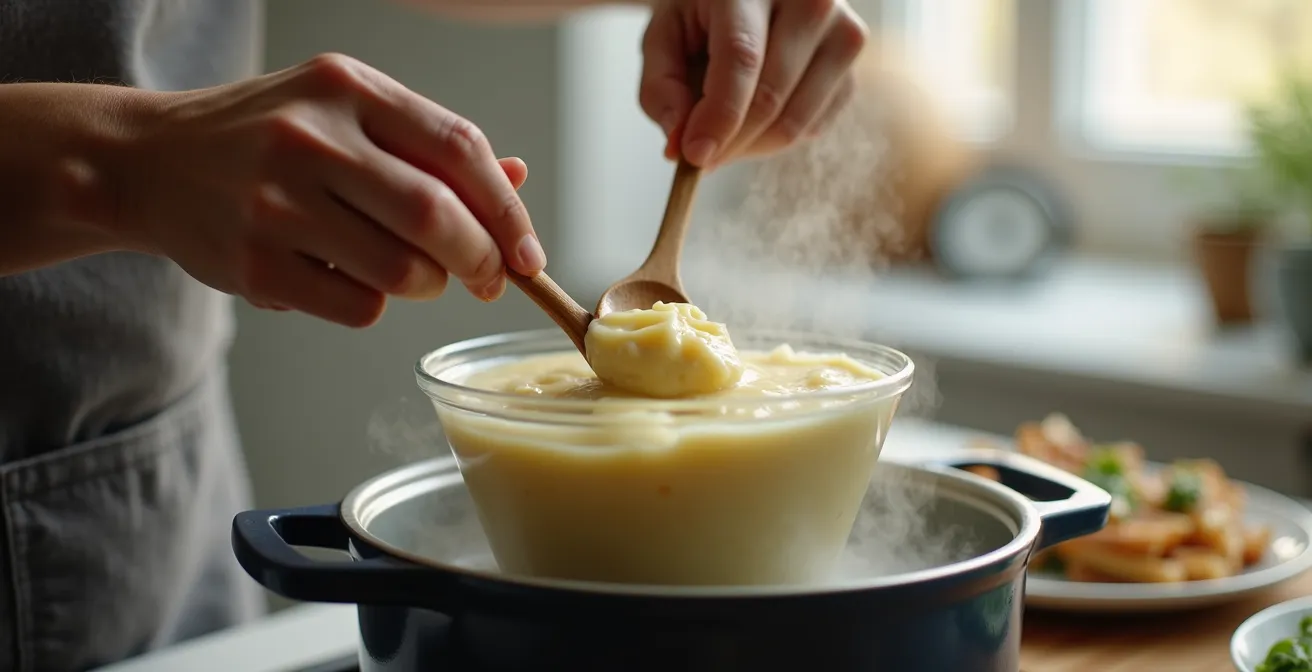
How to Keep Mashed Potatoes Warm for 2 Hours Without Drying Out?
Creamy, hot mashed potatoes are a cornerstone of celebration dinners, but they are notoriously difficult to hold at temperature without becoming gluey or dry. The oven is a poor choice, as its dry heat quickly ruins the texture. The secret to perfect, hot mashed potatoes served two hours after they’re made lies in one simple technique: a makeshift bain-marie, or a hot water bath.
This method provides gentle, moist heat that maintains both temperature and moisture perfectly. Simply place your finished mashed potatoes in a heatproof bowl (glass or metal works best), cover it, and set the bowl over a pot of simmering water on the stove. The steam from the water keeps the potatoes at an ideal serving temperature without ever drying them out. This is a low-effort, high-reward technique that frees up your oven for other dishes.
Another surprisingly effective method is using a picnic cooler as a “hot box.” Pour a few inches of hot water into a clean cooler, let it sit for a few minutes to warm the interior, then dump the water. Place your covered pot of mashed potatoes inside and close the lid. The insulation will keep them perfectly hot and steamy for up to three hours.
While a slow cooker might seem like a good option, it often creates hot spots that can scorch the edges and dry out the potatoes unless stirred frequently, adding another task to your list. The bain-marie is a true “set it and forget it” solution.
The following table, based on an analysis of different cooking methods, compares various techniques for keeping mashed potatoes warm, highlighting why the bain-marie is the superior choice for maintaining that just-made quality.
| Method | Temperature Maintenance | Moisture Retention | Equipment Needed | Risk Level |
|---|---|---|---|---|
| Makeshift Bain-Marie | Excellent (2+ hours) | Perfect with lid | Bowl, pot, water | Low |
| Cooler Hot Box | Good (3 hours) | Excellent | Picnic cooler, hot water | Very Low |
| Slow Cooker | Good | Can dry edges | Slow cooker | Medium (needs stirring) |
| Oven (Low Heat) | Fair | Poor without cover | Oven-safe dish | High (easily dries) |
| Insulated Pot | Fair (1 hour max) | Good | Thermal pot | Low but finite |
How to Build a “Theme Night” Schedule That Reduces Decision Fatigue?
One of the biggest mental drains when planning a large dinner is the sheer number of choices: what appetizer, what main, what side, what dessert? A “theme night” is a powerful tool for drastically reducing this decision fatigue. By choosing a theme—be it a cuisine (Italian, Mexican) or a concept (Taco Bar, One-Oven Wonder)—you create a framework that automatically narrows down your options and makes planning feel effortless.
This isn’t just about cohesive flavors; it’s about building an operational system. A family that frequently hosts large groups found success with what they call “Operational Themes.” For example, their “One-Oven Wonder” theme revolves around dishes like a make-ahead lasagna. As noted in their experience hosting for large groups, this dish is inexpensive, freezer-friendly, and feeds a crowd, making it a perfect logistical choice. Another successful theme was the “Room-Temperature Feast,” which focused on appetizers that could be set out in advance, naturally creating a gathering spot for guests upon arrival.
To implement this, you can create a simple menu template that you adapt to different themes. This provides structure while still allowing for creativity. The core template might be:
- Make-Ahead Protein: A dish that can be fully or partially cooked in advance (e.g., slow-cooked meatballs, braised carnitas).
- Room-Temperature Vegetable/Salad: A dish that requires no last-minute cooking (e.g., Caprese salad, Asian slaw).
- Hot Starch: A simple, large-batch carbohydrate (e.g., garlic bread, rice, roasted potatoes).
- No-Bake or Assemble-Only Dessert: A dessert that needs no oven time on the day of the party (e.g., tiramisu, pre-baked tart with fresh fruit).
Applying this template to an “Italian Night” theme could look like: slow-cooked meatballs (protein), a large Caprese salad (vegetable), baked garlic bread (starch), and tiramisu (dessert). The theme even helps automate the atmosphere—an Italian dinner playlist and a Negroni pitcher cocktail complete the experience with minimal extra thought. This system turns menu planning from a chore into a creative and streamlined process.
What Can Be Baked 24 Hours Before Your Tea Party?
The success of any large meal, whether a dinner party or a tea party, hinges on what can be accomplished the day before. Freeing up your time and oven space on the day of the event is paramount. The key is to think in terms of components and sub-assemblies, not just finished dishes. Many elements can be fully or partially prepared 24 hours in advance, and some dishes even improve in flavor when allowed to rest overnight.
Braised dishes like coq au vin or a short rib ragu are prime examples; their flavors meld and deepen overnight, making them taste even better the next day. For baked goods, focus on preparing the stable parts. You can bake cake layers, let them cool completely, and wrap them tightly in plastic wrap. On the day of the party, all that’s left is the enjoyable task of assembling them with fresh frosting. Similarly, pie crusts, tart shells, and crumble toppings can all be made and stored, ready for a quick assembly and bake.
Beyond main dishes and desserts, a “flavor bomb arsenal” is a caterer’s best friend. All of your dressings, marinades, compound butters, and herb-based sauces like gremolata can be made a day or two ahead. This not only saves time but also allows their flavors to fully develop. Here is a checklist of components you can confidently prepare 24 hours in advance:
- Dessert Sub-Assemblies: Bake and wrap cake layers. Prepare and store pie crusts or tart shells. Make crumble toppings.
- Blanched Vegetables: Green beans, asparagus, or broccoli can be blanched in boiling water, shocked in an ice bath to preserve their color and texture, and stored. They’ll only need a quick 3-minute sauté before serving.
- Flavor Bomb Arsenal: Prepare all salad dressings, marinades, and compound butters.
- Braised Dishes: Any slow-cooked stew or braise will be even more delicious the next day.
- Protein Prep: Proteins can be portioned, seasoned, and stored, covered, in the refrigerator, ready for their final cook.
By shifting your mindset to component-based prep, you distribute the workload and transform the day of your party from a frantic race against time into a calm and organized assembly process.
Key takeaways
- The “T-Minus” schedule, working backward from serving time, is your most powerful tool for eliminating timing stress.
- Maintaining temperature integrity is paramount. Always pre-warm serving dishes and use methods like a bain-marie for holding hot food.
- Systematize every detail, from guest allergy surveys to batched cocktails, to reduce decision fatigue and free up your time as a host.
How to Assemble a Thanksgiving Platter That Stays Hot and Looks Professional?
The final assembly of your food is where all your logistical work pays off. A beautifully styled, abundant platter that stays hot is the grand finale of your well-executed plan. This final step combines the principles of temperature integrity and visual appeal. As professional caterers know, the secret to hot food is preparation that happens long before guests arrive. Setting the table the night before is a start, but warming the platter itself is the real key.
Warming the platter in a low oven (200°F/93°C) makes it act like a radiator, significantly extending the heat-life of the food placed upon it. This simple step can maintain a proper serving temperature for an additional 20-30 minutes. When plating, place the hottest items (like sliced meat or roasted vegetables) in the center of the warm platter and arrange cooler garnishes or sauces around the edges.
Visual styling is just as important for creating a sense of celebration and generosity. Follow these professional food styling steps to create a platter that looks as good as it tastes:
- Platter Mapping: Before you begin, take a photo of your empty platter and quickly sketch a placement plan on your phone. This eliminates guesswork during the final rush.
- Pre-heat the Platter: As mentioned, warm your platter with hot water or in a low oven for at least 10 minutes.
- Apply the Rule of Odds: For visual appeal, group items in odd numbers, such as three small clusters of herbs or five piles of nuts.
- Create Balance: A great platter has a balance of Height (e.g., tall breadsticks), Color (e.g., vibrant herbs or pomegranate seeds), and Texture (e.g., crunchy nuts, smooth dip).
- Embrace Abundance: Use platters that are almost too small for the amount of food. This creates a look of overflowing generosity and abundance.
- The Last-Second Shine: Just before the platter leaves the kitchen, a final drizzle of finishing oil, a sprinkle of flaky sea salt, or a fresh squeeze of citrus can elevate the look and taste, making it truly professional.
This final assembly is not just about arranging food; it’s the culmination of your entire workflow. It’s the moment where your careful planning, scheduling, and temperature management come together to create a stunning and delicious result that you can proudly present to your guests.
By applying these logistical principles of workflow, scheduling, and temperature management, you are no longer just cooking; you are producing a catered event in your own home. This systematic approach is what will transform your hosting experience from one of stress and labor to one of joy and seamless execution. Apply these strategies to your next dinner party and rediscover the pleasure of entertaining.