The secret to a crisp biscuit base that survives in the fridge is not a single trick, but a systematic approach to controlling moisture migration at a molecular level.
- A hydrophobic (water-repelling) barrier like chocolate or cocoa butter is the most effective first line of defense.
- The choice of biscuit is critical; higher fat content and coarser crumbs inherently resist moisture absorption better than finer, lower-fat options.
Recommendation: For guaranteed success, always pre-bake your crust and apply a chocolate or egg-white seal before adding any cool, set filling. This creates a physical barrier that preserves texture for over 24 hours.
There is no greater culinary disappointment than crafting a beautiful, creamy dessert, only to serve it and discover the biscuit base has surrendered to a soft, soggy fate. For any dessert maker, this textural failure is a common and deep frustration. You’ve followed the recipe, you’ve blind-baked the crust, and you’ve let everything cool, yet the dreaded sogginess still creeps in after a few hours in the refrigerator. The common advice—bake it longer, use more butter—often fails to address the root cause of the problem.
The issue isn’t a lack of effort; it’s a lack of engineering. The battle against a soggy bottom is a battle against physics, specifically the relentless process of moisture migration. Water molecules from your wet filling are constantly seeking equilibrium, and your dry, porous biscuit base is their prime target. To win this battle, you need to stop thinking like just a baker and start thinking like a food engineer, employing strategic barriers and understanding the material science of your ingredients.
This guide moves beyond the basics. We will deconstruct the problem from an engineering perspective, analyzing how to create effective hydrophobic barriers, select the right materials (biscuits), and control the environment to maintain structural integrity. By understanding the ‘why’ behind each technique, you will gain the control to build desserts where the crunch is not a fleeting pleasure, but a guaranteed feature, even 24 hours later.
This comprehensive guide breaks down the essential engineering principles for preserving texture. From creating moisture shields to understanding ingredient properties and assembly timing, you will find actionable strategies to solve the soggy bottom problem for good.
Summary: How to Engineer Biscuit Crunch That Lasts in Moist Desserts for Over 24 Hours
- How Brushing Chocolate on Crusts Creates a Moisture Shield?
- Digestives vs Graham Crackers: Which Absorbs Moisture Slower?
- Jam First or Cream First: What Order Saves the Meringue Crunch?
- Assembly à la Minute: When to Add the Crunch Element?
- Can You Re-Crisp a Soggy Crumble Topping in the Oven?
- How to Store Filled Éclairs so the Choux Stays Crisp?
- Almond Flour Grittiness: How to Sift for a Finer Cake Crumb?
- 3 Classic Pastry Combinations That Guaranteed Success for Beginner Bakers
How Brushing Chocolate on Crusts Creates a Moisture Shield?
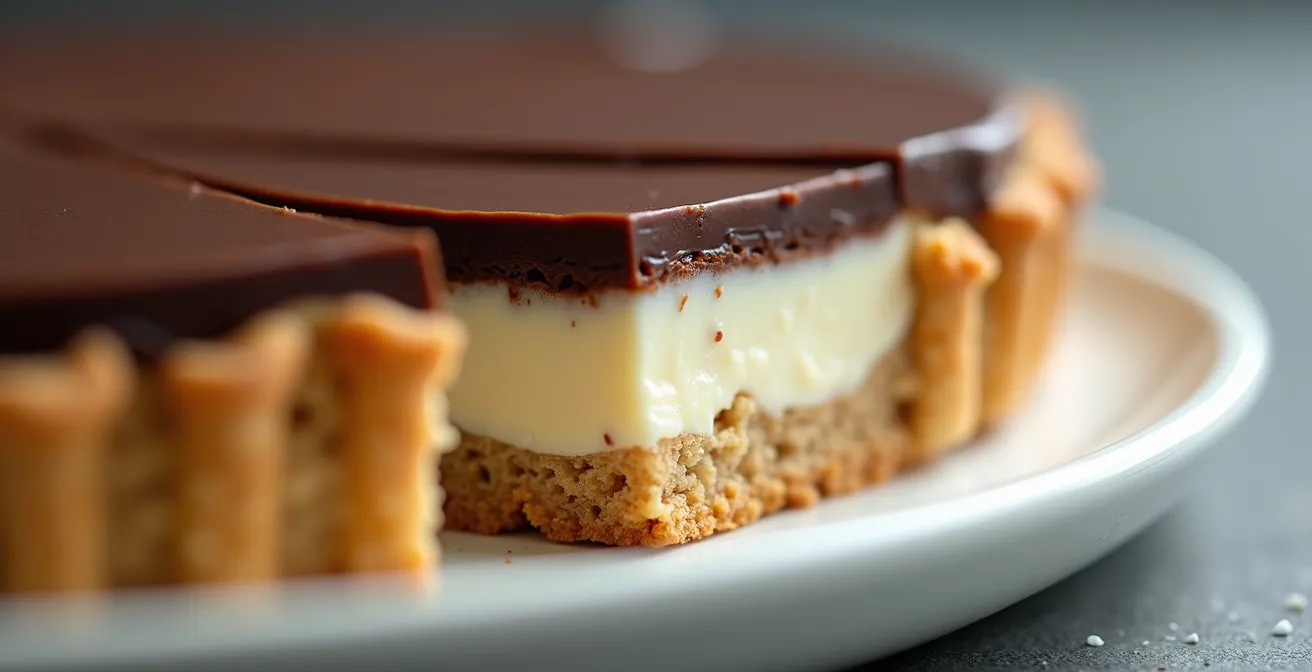
The most effective strategy against moisture migration is creating an impermeable barrier between the wet filling and the dry crust. Chocolate is the ideal material for this task because it is hydrophobic, meaning it naturally repels water. When melted chocolate is brushed onto a pre-baked biscuit base, the cocoa butter and solids cool to form a solid, non-porous layer. This layer acts as a physical wall, blocking water molecules from the filling from seeping into the biscuit crumb.
For this shield to be effective, the application must be precise. The crust must be fully pre-baked (blind-baked) and, crucially, completely cool. Applying chocolate to a warm crust can cause it to melt in, rather than form a distinct layer on top. A thin, even coating is all that is needed; a thick layer can overpower the dessert’s flavor profile. Both dark, milk, and white chocolate work, but dark chocolate, with its higher cocoa solids content, often forms the most robust and least sweet barrier.
While chocolate is a primary tool, it’s not the only one. Other techniques can create similar protective seals. An egg white wash, brushed on a hot crust and briefly baked, creates a protein-based film. Alternatively, a “crust dust”—a mix of flour and sugar—can be sprinkled over the base before filling. It works by absorbing the very first wave of moisture, sacrificing itself to protect the crust underneath. These methods provide varying levels of protection but all operate on the same principle: interrupting the path of moisture migration.
Action Plan: Professional Moisture Barrier Techniques
- Pre-bake your crust and let it cool completely, then brush with a thin layer of melted dark, milk, or white chocolate and allow it to set.
- For a transparent barrier, brush a lightly beaten egg white over a hot, just-baked crust and return it to the oven for 2-3 minutes to set the protein film.
- Create a protective layer with a homemade praline spread made from ground nuts, butter, and brown sugar, which adds both a barrier and flavor.
- As a final defense, dust the pre-baked crust with ‘crust dust’—an equal-parts mixture of flour and sugar—just before adding your filling to absorb initial moisture.
Digestives vs Graham Crackers: Which Absorbs Moisture Slower?
The choice of biscuit is a critical engineering decision that significantly impacts the final texture of your dessert base. Not all biscuits are created equal when it comes to resisting moisture. The key variables are fat content and crumb structure. Biscuits with a higher fat content are naturally more resistant to water, as the fat coats the flour particles, creating a built-in hydrophobic effect. Likewise, a coarser crumb structure means fewer, larger pores for water to penetrate, slowing down the absorption process.
Digestive biscuits, for instance, generally have a higher fat content and a coarser, more crumbly texture when ground. This makes them inherently more resistant to becoming soggy compared to a lower-fat biscuit like a Rich Tea. Graham crackers fall somewhere in the middle, offering a good crunch and medium fat content, but their structure requires proper compression in the tin to minimize voids where moisture can collect.

The following table, based on an analysis of biscuit properties for cheesecake bases, breaks down these differences. It highlights how material selection is the first step in designing a moisture-resistant crust. A biscuit that needs less butter to bind is often a superior choice, as excess butter can separate and contribute to a greasy, rather than crisp, texture.
| Biscuit Type | Fat Content | Texture After Grinding | Moisture Resistance |
|---|---|---|---|
| Rich Tea | Lower | Finer, more absorbent | Forms solid base, needs more butter |
| Digestives | Higher | Coarser, crumbly | Better natural resistance, less butter needed |
| Graham Crackers | Medium | Coarse, crunchy | Good resistance when properly compressed |
Jam First or Cream First: What Order Saves the Meringue Crunch?
In layered desserts like an Eton mess or a pavlova, the order of assembly is paramount to preserving texture. The crucial factor here is water activity (aW), a measure of the “free” or available water in an ingredient that is capable of migrating and causing sogginess. Fresh cream has a very high water activity, meaning it will readily release its moisture into anything it touches, especially a dry, porous meringue.
A cooked jam, on the other hand, has a much lower water activity. The high concentration of sugar in jam chemically binds to water molecules, “locking” them in place and making them less available to move. This principle explains why jam is a far superior barrier layer against moisture than cream.
A high-sugar, cooked jam has lower ‘free’ water available to make things soggy compared to fresh cream.
– Article analysis from recipe development, Based on water activity principles in dessert assembly
Therefore, when assembling a dessert with meringue, always place the jam layer directly onto the meringue first. This creates a low-aW barrier that protects the delicate, crisp structure from the high-aW cream. This isn’t just a matter of taste or tradition; it’s a direct application of food science to control texture. The same logic applies to cake layers or trifle sponges: always insulate them from wet fillings with a layer of jam, ganache, or buttercream.
Case Study: The Professional’s Egg White Seal
To solve this exact issue with wet fillings, professional bakers employ a technique known as an egg white wash. An analysis of professional pastry techniques shows that this method is highly effective. Bakers lightly beat an egg white and brush it over the surface of a blind-baked (and still hot) biscuit crust. The crust is then returned to the oven for just a few minutes. The heat coagulates the protein, creating a thin, transparent, and flavorless seal that effectively prevents moisture from a wet filling, like cheesecake batter, from penetrating the base. This simple step can keep a crust crisp for over 24 hours in the refrigerator.
Assembly à la Minute: When to Add the Crunch Element?
Even with the best-laid plans and most robust barriers, time is the ultimate enemy of crunch. For elements where a protective barrier isn’t possible—such as a crumble topping, toasted nuts, or biscuit crumbles sprinkled over a mousse—the only reliable strategy is last-minute assembly, or “assemblage à la minute.” This technique removes the variable of time from the moisture migration equation.
The core principle is simple: store your wet and dry components separately and combine them only just before serving. The crunchy elements should be kept in a completely airtight container at room temperature. Storing them in the refrigerator is a mistake, as the cool, humid environment can introduce moisture even before they touch the dessert. The wet component (filling, cream, or mousse) should be kept chilled, as cold temperatures slow down molecular movement, including water migration, albeit temporarily.
For maximum textural contrast, the timeline is strict. Adding the crispy toppings no more than 10 minutes before the dessert reaches the table will guarantee the best experience. If that’s not practical, you might stretch it to an hour, but only if the filling is thoroughly chilled and set. A more creative solution is to deconstruct the dessert entirely. Serve the crunchy crumble, nuts, or praline in a separate bowl, allowing guests to add their own topping. This not only guarantees perfect texture but also adds an interactive and elegant element to the dining experience.
- For maximum crunch: Add crispy elements no more than 10 minutes before serving.
- For acceptable texture: Assemble up to 1 hour before serving, but only if the filling is completely cold and firmly set.
- Store components separately: Keep all crunchy toppings in an airtight container at room temperature, never in the fridge.
- Consider ‘deconstructed’ presentation: Serve crunch elements on the side for guests to add themselves, ensuring perfect texture.
Can You Re-Crisp a Soggy Crumble Topping in the Oven?
Yes, reviving a slightly softened crumble topping is entirely possible, but the method matters. The goal is to drive off the absorbed moisture without burning the sugar or over-baking the flour. A conventional oven can work, but an air fryer is often superior due to its powerful convection capabilities, which excel at removing surface moisture quickly. The key is to use a moderate temperature and a short burst of time. Spreading the crumble in a thin, even layer on a baking sheet maximizes its exposure to the hot, dry air.
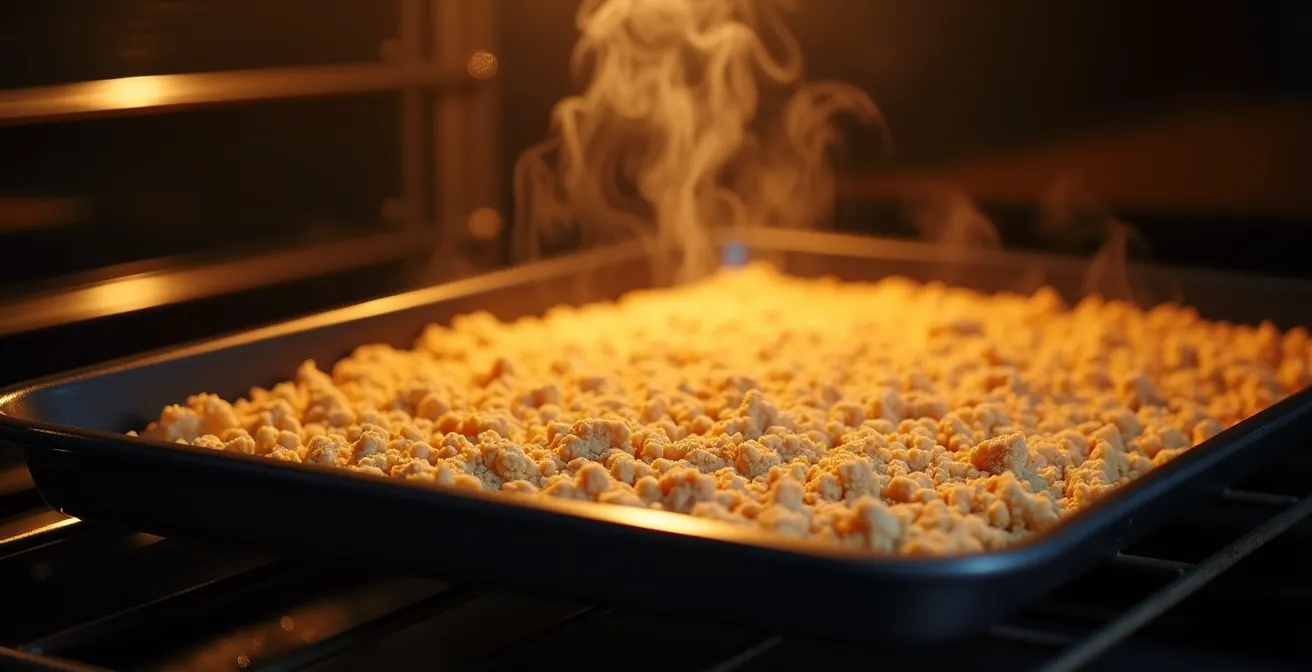
For best results, a gentle hand is needed. Re-crisping is a quick process; air fryer tests show re-crisping takes just 2-3 minutes at 180°C (355°F). It’s better to check it early and add more time in 1-minute increments than to risk scorching it. However, prevention is always better than a cure. To engineer a more moisture-resistant crumble from the start, incorporate ingredients that manage water.
Professional bakers often add rolled oats and chopped nuts to their crumble mixtures. The oats are hygroscopic and absorb excess moisture from the fruit filling while maintaining their own structure, while the high fat content of the nuts provides a natural water-repellent quality. Adding a tablespoon of cornstarch to the dry mix also helps by binding with any rogue juices, creating a more stable structure that’s less prone to sogginess in the first place. This proactive approach to formulation is the hallmark of a true dessert engineer.
How to Store Filled Éclairs so the Choux Stays Crisp?
Storing filled choux pastry, such as éclairs or profiteroles, is one of the most challenging textural puzzles in patisserie. Choux pastry is essentially a hollow, dry shell, making it extremely susceptible to absorbing moisture from its creamy filling and the ambient air. The common instinct to store them in an airtight plastic container is, counterintuitively, the worst possible choice. Plastic traps every bit of moisture released by the filling, creating a miniature steam room that guarantees a soft, sad pastry.
The professional solution is to control the environment. Storing the filled éclairs in the refrigerator is necessary for food safety, but the container must be able to manage humidity. This is where a simple cardboard bakery box becomes a powerful engineering tool.
Advise against airtight plastic containers which trap humidity. Recommend storing filled éclairs in a cardboard bakery box in the fridge, as the cardboard absorbs excess moisture.
– Professional pastry storage technique, Based on moisture control principles in pastry storage
The cardboard is porous and acts as a desiccant, wicking away the excess humidity emanating from the pastry cream, keeping the atmosphere inside the box relatively dry and preserving the choux’s crispness for several hours. For even greater protection, some professionals employ a double-bake technique. This involves returning the fully baked and cooled choux shells to a moderate oven for a few minutes to drive off any residual internal moisture. Immediately after, the interior is brushed with a thin layer of melted cocoa butter, creating a hydrophobic seal from the inside out before the choux is filled.
- First, bake the choux shells until they are completely dry and golden brown.
- Allow them to cool fully at room temperature.
- Just before you plan to fill them, return the empty shells to a 175°C (350°F) oven for 2-3 minutes to extra-dry them.
- Let them cool briefly, then immediately brush the inside with a thin layer of melted cocoa butter.
- Once the cocoa butter sets, you can fill the shells, knowing you’ve created an internal moisture barrier.
Almond Flour Grittiness: How to Sift for a Finer Cake Crumb?
While not a problem of sogginess, the grittiness of almond flour presents a different kind of textural failure. The goal in cakes like financiers or macarons is a smooth, fine crumb, but the coarse nature of ground nuts can interfere. Simply sifting almond flour is often ineffective, as the particles are oily and tend to clump. The engineering solution involves altering the flour’s physical properties before it’s even incorporated into the batter.
Professional pastry chefs overcome this by co-processing the almond flour. They grind the almond flour together with the powdered sugar required by the recipe in a food processor. The sugar acts as a crucial “grinding aid”; it’s a dry, crystalline abrasive that helps break down the almond particles into a finer powder. More importantly, it absorbs the nut oils as they are released, preventing the mixture from turning into almond paste. This technique results in a dramatically finer, less gritty flour.
Another critical step is hydration. After the batter is mixed, allowing it to rest is not an optional step. As confirmed by pastry experts, a resting time of at least 30 minutes is recommended before baking. During this rest period, the almond flour particles fully absorb the liquid from the eggs and other wet ingredients. This hydration swells the flour, softening its texture and significantly reducing any perception of grittiness in the final baked product. For consistently smooth results without extra processing, using a product specifically milled to be extra-fine, such as Bob’s Red Mill Super Fine Almond Flour, provides a reliable starting point.
Key Takeaways
- The fight against sogginess is a fight against moisture migration; a physical, hydrophobic barrier is your best weapon.
- Ingredient choice matters: higher-fat biscuits and lower water-activity fillings (like cooked jam) are inherently more stable.
- For the most delicate crunchy elements, separate storage and last-minute assembly is the only foolproof method.
3 Classic Pastry Combinations That Guaranteed Success for Beginner Bakers
Applying all these engineering principles can feel daunting. For beginners, or for moments when you need a guaranteed success, it’s wise to choose dessert combinations that are inherently stable and forgiving. These classic pairings are popular for a reason: they have built-in mechanisms for moisture control, making them much less prone to textural failure.
The first foolproof combination is a no-bake cheesecake with a chocolate-sealed digestive crust. This removes the complexities of a baked filling, which can release steam and moisture as it cools. By using a high-fat digestive biscuit base (with a 2:1 biscuit-to-butter ratio for optimal structure) and sealing it with a layer of melted chocolate, you create a robust structure that easily withstands the gentle moisture of a no-bake filling for days.
Another classic is a shortcrust apple pie using pre-cooked apples. Shortcrust pastry is less porous than a biscuit crumb base, and cooking the apple filling separately allows you to control its moisture content precisely. By reducing the juices into a thick syrup and allowing the filling to cool completely before it goes into the pre-baked crust, you minimize the amount of free water available to make the bottom soggy. Finally, the simplest method of all is physical separation: a rich, flourless chocolate cake served with a side of nut praline. The praline is a separate crunchy element that never touches a wet surface until the moment of serving, guaranteeing its texture.
This table outlines these foolproof combinations, highlighting the core technique that ensures their success.
| Combination | Key Technique | Moisture Control Method | Success Rate |
|---|---|---|---|
| No-Bake Cheesecake + Chocolate-Sealed Digestive Crust | 2:1 biscuit to butter ratio | Chocolate barrier layer | High – foolproof for beginners |
| Shortcrust + Low-Moisture Cooked Apple | Pre-bake crust, cool filling | Reduced filling moisture | High – texture contrast maintained |
| Flourless Chocolate Cake + Nut Praline | Separate crunchy element | Keep praline separate until serving | Very High – inherently stable |
By mastering these principles of moisture engineering, you move from hoping for a crisp base to designing one. Start applying these techniques to your next dessert project and transform textural disappointment into guaranteed success.
Frequently Asked Questions on How to Maintain Biscuit Crunch
Why does my biscuit base get soggy even after blind baking?
Moisture from refrigeration and wet fillings penetrates unsealed crusts. Blind baking dries the crust, but it doesn’t make it waterproof. To prevent this, you must apply a moisture barrier like a thin layer of melted chocolate or an egg white wash to the crust after blind baking and before adding the filling.
How long can a chocolate-sealed crust maintain crispness?
With a proper, even coating of chocolate, a biscuit crust can remain perfectly crisp for 24-48 hours when refrigerated. This is a significant improvement compared to an unsealed crust, which typically starts to soften within just 2-4 hours under the same conditions.
What’s the ideal butter-to-biscuit ratio for moisture resistance?
For a standard cheesecake base, a 1:2 ratio by weight (e.g., 125g of melted butter to 250g of biscuit crumbs) is optimal. This provides enough fat to bind the crumbs together into a firm base without adding excess moisture that can lead to a greasy or soggy result.