In summary:
- Broken ganache is a failed emulsion of fat and water, not a failed recipe. The cause is always an imbalance in ratio, temperature, or agitation.
- Temperature is critical: cream should be hot enough to melt the chocolate but the final mixture must not overheat, which causes the fat to separate.
- To fix a split ganache, remove it from heat and vigorously whisk in a small amount of room-temperature liquid (cream or milk) from the center outwards to rebuild the emulsion.
- Professional chefs use invert sugars like glucose or corn syrup to create a more stable emulsion that is less likely to break and has a longer shelf life.
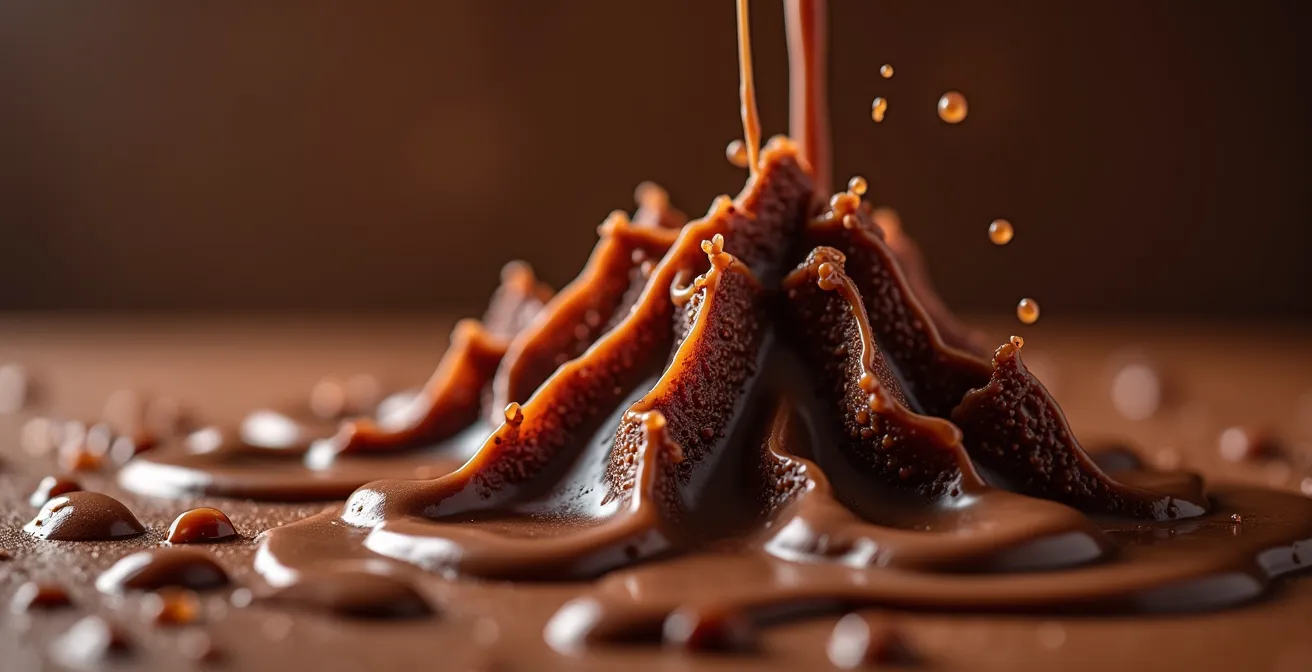
It’s a moment of pure panic for any baker: the glossy, smooth, homogenous river of chocolate you envisioned has become a grainy, oily, separated mess. That beautiful truffle filling or perfect cake glaze now looks curdled and unusable. The instinct is to blame the recipe, the chocolate, or even your own skills. But the truth is far less personal and much more scientific. Your ganache didn’t fail; its emulsion simply broke.
Most advice focuses on quick fixes like “add more hot cream” or “use a blender,” but these are just treating the symptoms. To truly master ganache, you must think like a pastry troubleshooter—diagnosing the root cause. A stable ganache is a delicate suspension of fat (from cocoa butter and cream) in water (from the cream). When this fat and water matrix collapses, it splits. This failure almost always comes down to one of three culprits: an incorrect ratio of fat to water, a thermal shock from improper temperatures, or insufficient agitation.
This guide moves beyond simple kitchen tricks. We will dissect the science of the chocolate emulsion, exploring how ratios, temperature, and specific ingredients influence its stability. Instead of offering a one-size-fits-all solution, we will provide a diagnostic framework to understand *why* your ganache broke and equip you with targeted, professional techniques to rescue it every time. By understanding the principles, you’ll not only fix this batch but prevent future failures.
This article provides a complete diagnostic walkthrough, from the fundamental science to advanced applications. Discover the precise ratios for different uses, the critical temperature mistakes to avoid, and the universal techniques that apply to any broken emulsion, even beyond ganache.
Summary: A Pastry Troubleshooter’s Guide to Perfect Ganache
- Cream to Chocolate Ratios: How to Adjust for Truffles vs Glazes?
- The Pouring Temperature Mistake That Makes Ganache Grainy
- How to Infuse Earl Grey into Cream Before Making Ganache?
- Coconut Milk vs Water Ganache: Which Creates a Silkier Mouthfeel?
- Why Professional Pastry Chefs Add Glucose Syrup to Ganache?
- How to Fix a Broken Pan Sauce Using Only Water and Agitation?
- How Cool Should Ganache Be Before Pouring into a Tart Shell?
- Egg Whites or Heavy Cream: Which Base Creates the Most Airy Mousse Structure?
Cream to Chocolate Ratios: How to Adjust for Truffles vs Glazes?
The foundation of any successful ganache is its ratio of chocolate to cream. This isn’t just about flavor; it’s about structuring the fat-and-water emulsion for a specific purpose. A pourable glaze and a firm, rollable truffle filling are born from the same two ingredients, but their textures are dictated entirely by their relative proportions. Thinking of it as a spectrum is helpful: more cream creates a looser, more fluid emulsion, while more chocolate creates a denser, more rigid fat structure.
A classic starting point is a 1:1 ratio (equal parts by weight) for a standard, versatile ganache. However, this is only a baseline. The type of chocolate used dramatically shifts the balance. Higher cacao percentages mean more cocoa solids and cocoa butter (fat) and less sugar. To maintain a stable emulsion with darker chocolates, you must compensate with more liquid. For instance, professional tests show that a ganache made with 70% cacao chocolate requires about 15% more cream than one made with 55% cacao chocolate to achieve the same consistency. Ignoring this adjustment is a primary cause of grainy or overly thick ganaches.
To move from theory to practice, consider these professional starting points:
- For Glazes and Drips: A 1:1 ratio (e.g., 200g chocolate to 200g cream) provides a fluid consistency that flows beautifully over a cake.
- For Whipped Ganache & Fillings: A 1:2 ratio (e.g., 200g chocolate to 400g cream) results in a softer set that can be whipped into a light, airy texture once cooled.
- For Truffles: A 2:1 ratio (e.g., 400g chocolate to 200g cream) creates a firm, dense structure that holds its shape for rolling and coating.
This image visually breaks down how these different ratios translate into tangible textures, from a flowing glaze to a firm, scoopable truffle base.

Mastering these ratios is the first step in preventing a broken ganache. If your ganache is watery or fails to set, the culprit is likely too much cream. If it’s stiff and oily from the start, you may have too much chocolate fat for the amount of water available to create an emulsion.
The Pouring Temperature Mistake That Makes Ganache Grainy
After ratio, temperature is the most critical variable in the ganache equation. A perfect ratio can still result in a split, oily, or grainy mess if temperatures are not managed with precision. The mistake is twofold: the temperature of the cream when poured over the chocolate, and the temperature of the mixture during emulsification. Both can disrupt the delicate crystallization of the cocoa butter, causing the fat to separate from the water content of the cream.
First, the cream must be hot enough to melt the chocolate completely. Scalding the cream to just before it boils is common practice. Research from King Arthur Baking’s temperature guidelines reveals that bringing the cream to around 180°F (82°C) is ideal. At this temperature, it has enough thermal energy to melt finely chopped chocolate without being so hot that it “burns” the emulsion, causing the fat to separate immediately. If the cream is too cool, it won’t melt the chocolate evenly, leaving unmelted bits that lead to a grainy texture.
Second, and more subtly, the ganache must be emulsified within an optimal temperature window, typically between 90-110°F (32-43°C). If the ganache cools too much before it’s fully whisked together, the cocoa butter will begin to crystallize prematurely, resisting emulsification and creating a grainy texture. Conversely, if the mixture is agitated while it’s too hot (above 110°F), the fat becomes too fluid and unstable, separating out as an oily sheen on the surface. An infrared thermometer is a pastry chef’s best friend for this very reason.
Understanding these temperature-related symptoms is the key to diagnosis. This chart breaks down the common problems, their temperature-related causes, and the immediate fix.
| Symptom | Temperature Cause | Quick Fix |
|---|---|---|
| Oily sheen on top | Cream >120°F (49°C) | Add cold milk gradually |
| Dry, clumpy texture | Cream <80°F (27°C) | Double boiler reheating |
| Grainy appearance | Mixed below 90°F (32°C) | Warm to 95°F and whisk |
| Split/separated | Overheated >110°F (43°C) | Corn syrup rescue method |
By monitoring temperatures, you move from hoping for a good result to engineering one. Keeping the ganache within its “happy zone” during mixing is the most effective way to prevent a temperature-induced break.
How to Infuse Earl Grey into Cream Before Making Ganache?
Infusing flavors into the cream is a fantastic way to elevate a simple ganache, but it introduces a new variable: extracting desirable aromas without unwanted bitterness. With a flavor like Earl Grey tea, the goal is to capture the fragrant bergamot oil while leaving behind the bitter tannins from the tea leaves. The method of infusion—hot versus cold—has a profound impact on the final taste profile, once again highlighting the critical role of temperature.
The conventional method is a hot infusion: heating the cream with the tea leaves, letting it steep for a few minutes, and then straining. While fast, this method often extracts tannins, which can create a subtle but distinct astringency in the finished ganache. A more refined, professional approach is the cold infusion method. This involves steeping the tea leaves in the cold cream in the refrigerator for an extended period, typically 12 to 24 hours. The cold temperature allows the fat in the cream to gently extract the volatile, oil-based flavor compounds (like bergamot) without dissolving the water-soluble tannins.
Case Study: The Professional Chocolatier’s Tea Infusion Technique
Chocolatiers at Santa Barbara Chocolate favor the cold infusion method for their delicate tea-infused ganaches. Their process involves steeping 2 tablespoons of loose Earl Grey tea in 1 cup of cream for 12-24 hours in the refrigerator. After straining, they found this method extracts the pure, clean notes of bergamot without the bitterness associated with hot steeping. Internal tests revealed that a hot infusion at 180°F extracted 40% more tannins, resulting in a flavor profile they deemed unacceptably astringent for their high-end chocolates.
To execute a perfect cold infusion for an Earl Grey ganache, follow these steps:
- Combine your heavy cream and loose-leaf Earl Grey tea in a sealed container.
- Refrigerate for at least 12 hours, or up to 24 for a more intense flavor.
- Strain the cream through a fine-mesh sieve, pressing gently on the tea leaves to extract all the fragrant, infused cream.
- Proceed with your ganache recipe, heating the now-strained and flavored cream to the correct temperature before pouring it over your chocolate. For an extra boost, a tiny pinch of salt can help the bergamot notes pop.
This patient method respects the delicate nature of the ingredients and produces a demonstrably superior result, proving that sometimes the best technique is the one that uses time and temperature to its advantage.
Coconut Milk vs Water Ganache: Which Creates a Silkier Mouthfeel?
The science of ganache isn’t limited to dairy. Understanding the core principles of fat and water emulsions allows for incredible versatility, including the creation of vegan or dairy-free ganaches. The two most common liquids used are full-fat coconut milk and water. While both can be used to make ganache, they produce dramatically different results in terms of mouthfeel, texture, and stability, all due to one key component: fat.
A water-based ganache, often called a “ganache à l’eau,” is the purest expression of chocolate. With no additional fat or milk solids, the flavor of the cacao is front and center. The texture is intensely rich and fudge-like, but it can lack the creamy, melting quality we often associate with traditional ganache. It sets up very firm and can sometimes be less stable, as there is no extra fat to help create a robust emulsion.
On the other hand, full-fat coconut milk creates a ganache with a remarkably silky and luxurious mouthfeel, closely mimicking that of heavy cream. The reason is simple: fat content. While water has 0% fat, data from ganache emulsion science shows that coconut milk contains around 24% fat. This fat, primarily composed of medium-chain triglycerides, integrates into the emulsion alongside the cocoa butter, creating a richer, more complex, and more stable fat-and-water matrix.
Full-fat coconut milk creates a silkier mouthfeel because its medium-chain triglycerides contribute to a richer, more stable emulsion that coats the tongue, similar to dairy cream.
– Cocoa & Heart Chocolatiers, Professional Chocolate Making Guide 2024
The choice between the two depends entirely on the desired outcome. For a pure, intense chocolate flavor in a tart filling where a firm set is desired, a water ganache is an excellent choice. But for a vegan truffle, a creamy frosting, or any application where a silky, melting mouthfeel is the goal, full-fat coconut milk is the superior option. Its inherent fat content makes it a near-perfect substitute for heavy cream, delivering a product that is both stable and decadent.
Why Professional Pastry Chefs Add Glucose Syrup to Ganache?
Walk into any professional pastry kitchen, and you’ll likely see a large tub of glucose syrup or corn syrup. For ganache, this ingredient is a secret weapon, used not for sweetness, but for its powerful effects on texture, stability, and shelf life. Glucose is an invert sugar, meaning it behaves differently from regular sucrose (table sugar). Its inclusion is a purely scientific move to engineer a better, more reliable emulsion.
The primary function of glucose in ganache is to prevent sugar crystallization. As ganache cools and sits, the sugar within the chocolate can form microscopic crystals, leading to a grainy or sandy texture over time. Glucose interferes with this process, keeping the ganache smooth and glossy for much longer. This is particularly important for confections that will be stored for several days.
Furthermore, glucose is hygroscopic, meaning it attracts and holds onto water. In a ganache emulsion, this is incredibly beneficial. It helps to bind the water from the cream more tightly within the fat matrix, making the entire structure more stable and far less likely to split or weep. This stabilizing effect is so powerful that professional pastry research demonstrates that adding just 5-10% glucose syrup (relative to the total weight) can extend a ganache’s shelf life from a few days to over two weeks by inhibiting microbial growth and preventing separation.
This stabilizing property also makes corn syrup (a readily available type of glucose syrup) an incredible tool for rescuing a broken ganache. Renowned chocolatier Andrew Shotts famously developed a method where a small amount of boiling corn syrup is whisked into a split ganache. The intense heat and powerful emulsifying properties of the syrup can force even the most hopelessly separated mixture back into a smooth, stable state without diluting the flavor, a technique that has saved countless batches of expensive chocolate in professional settings.
How to Fix a Broken Pan Sauce Using Only Water and Agitation?
The moment of panic when a ganache splits feels unique, but the underlying science is universal. A broken ganache is the same phenomenon as a broken vinaigrette, a separated hollandaise, or an oily pan sauce. They are all emulsions that have failed. Understanding this connection is the key to unlocking a universal rescue technique that works across the kitchen, often with nothing more than water and a whisk.
An emulsion is a suspension of one liquid in another that wouldn’t normally mix, like fat and water. The break happens when the droplets of the dispersed liquid (fat, in the case of ganache) coalesce and separate from the continuous liquid (water). This can be caused by an incorrect ratio, thermal shock, or improper agitation. The fix, therefore, involves re-establishing that delicate suspension.
Taking the pan off heat is like letting your cream cool. Adding cold water is like adding cold cream to ganache. The science is identical – both are emulsions breaking for the same reasons: incorrect temperature or ratio.
– PJ Hamel, King Arthur Baking Blog
This brilliant insight means the same rescue technique for a greasy pan sauce can save your ganache. The method relies on creating a new emulsion nucleus. By adding a very small amount of liquid and whisking vigorously in the center of the mixture, you create a tiny, stable core. As you continue to whisk outwards, this stable core gradually pulls the separated fat and water from the surrounding mixture back into a homogenous state. You can even fix a ganache that has set and broken overnight by gently rewarming it over a double boiler until it is fluid again, then applying this technique. Adding more chocolate is rarely the answer, as it can throw the fat ratio even further off balance.
Your Action Plan: The Universal Emulsion Rescue Technique
- Remove from Heat: Immediately take the pan or bowl off the heat source as soon as you see separation (an oily sheen or grainy texture).
- Add Liquid: Add just 1 teaspoon of room-temperature or slightly warm liquid (water for a pan sauce, milk or cream for ganache) directly into the center of the broken mixture.
- Create the Nucleus: With a whisk or spatula, begin stirring vigorously in a small, tight circle right in the center where you added the liquid. You will see a small patch of smooth, emulsified mixture begin to form.
- Expand the Emulsion: Continue whisking, gradually widening your circles to incorporate more of the separated mixture from the sides into the stable center. The entire mixture should become smooth and glossy.
- Repeat if Necessary: If the mixture is still not fully emulsified, add another teaspoon of liquid and repeat the process. Patience is key.
This technique is a testament to understanding the ‘why’ behind the ‘how’. By treating the problem as a broken emulsion, you can fix it with a fundamental scientific principle, not just a recipe-specific trick.
Key takeaways
- Ganache is a fat-in-water emulsion; it breaks due to imbalances in ratio, temperature, or agitation.
- The ideal temperature for cream is ~180°F (82°C) to melt chocolate, while the emulsion itself should be mixed between 90-110°F (32-43°C).
- To fix a broken ganache, whisk a small amount of room-temperature liquid into the center to create a new emulsion nucleus and gradually incorporate the separated parts.
How Cool Should Ganache Be Before Pouring into a Tart Shell?
You have successfully made a beautiful, stable, glossy ganache. The final hurdle before a perfect dessert is the application, and once again, temperature is the gatekeeper of success. Pouring ganache into a pre-baked tart shell when it is too hot or too cold can ruin the texture of both the filling and the crust. The goal is to pour when the ganache is fluid enough to level itself into a smooth surface but cool enough that it doesn’t damage the tart shell.
Pouring ganache that is too hot—typically above 100°F (38°C)—is a common mistake with disastrous consequences. A pre-baked tart shell, especially one made with a buttery pâte sablée, is rich in solid fat. Hot ganache will instantly melt the butter in the crust, causing it to become soggy and weak. The fat from the crust can even leach into the ganache, potentially causing it to split along the bottom. The result is a greasy base and a compromised structure.
On the other hand, waiting for the ganache to cool too much presents its own problems. As it cools, it thickens. If poured below 80-85°F (27-29°C), it will be too viscous to flow evenly into the shell, resulting in lumps, an uneven surface, and air pockets. Furthermore, this can affect the final appearance. A glossy finish on a set ganache is the result of proper cocoa butter crystal formation, which occurs best within a specific temperature range. Pouring it too cold disrupts this process, leading to a dull, matte, or streaky surface.
So, what is the magic number? According to professional pastry guidelines, the perfect pouring temperature range for a tart filling is between 85-95°F (29-35°C). At this temperature, the ganache is still fluid and will create a perfectly smooth, glossy top, but it is cool enough that it won’t melt the butter in your carefully baked shell. If you don’t have a thermometer, the “lip test” is a classic pastry chef trick: a small dab on your lower lip should feel neutral or just slightly cool, never warm.
Egg Whites or Heavy Cream: Which Base Creates the Most Airy Mousse Structure?
The principles of ganache—a stable fat and water emulsion—are foundational for many other desserts, most notably chocolate mousse. A classic mousse is essentially a ganache that has been lightened by folding in an aerating agent. The two primary agents used are whipped heavy cream (crème fouettée) or whipped egg whites (meringue). The choice between them fundamentally changes the final structure and texture of the mousse, all based on the science of how they encapsulate air.
A mousse made with a whipped cream base is rich, dense, and creamy. The air bubbles are trapped within a network of fat globules from the cream. This creates a luxurious, melting mouthfeel, but the flavor of the chocolate can be slightly muted by the high dairy fat content. The structure is less stable at room temperature as the fat can soften, making it best served chilled.
Conversely, a mousse made with a meringue base (whipped egg whites and sugar) is significantly lighter, foamier, and more delicate. Here, the air is trapped within a network of coagulated proteins from the egg whites. This structure is more stable at room temperature and allows the flavor of the chocolate to be more prominent and pure, as there is no extra dairy fat to coat the palate. The texture is less “creamy” and more “airy” or foamy.
Regardless of the chosen base, the success of the mousse hinges on one critical temperature checkpoint borrowed directly from our ganache knowledge. The ganache base must be cooled to a specific range—typically 85-95°F (29-35°C)—before the whipped cream or meringue is folded in. If the ganache is too hot, it will instantly melt the fat in the whipped cream or deflate the protein structure of the meringue, destroying the airy texture you worked to create. The result will be a dense, heavy, or even soupy mousse. This demonstrates how mastering the fundamental principles of temperature control in a simple ganache directly translates to success in more complex desserts.
Apply this diagnostic approach to your next batch of ganache, mousse, or even pan sauce. By understanding the science of emulsions, you can move from following a recipe to engineering a perfect result, transforming a source of anxiety into a testament to your skill.
Frequently Asked Questions About Why Your Ganache Splits and How to Rescue It
What happens if ganache is too hot when poured?
Pouring ganache above 100°F (38°C) into a butter-based tart shell will melt the butter in the crust. This creates a soggy, weak bottom and can even cause the fat from the crust to leach into the filling, potentially causing it to separate.
How do I test temperature without a thermometer?
The classic pastry chef method is the “lip test.” Dab a tiny amount of the ganache onto your lower lip. For pouring into a tart, it should feel neutral or slightly cool to the touch, not warm. This indicates it’s likely within the safe 85-95°F (29-35°C) range.
What causes a dull finish on set ganache?
A dull, matte, or uneven surface on a set ganache is usually caused by improper temperature control during application. Pouring the ganache when it’s too cold (typically below 80°F or 27°C) prevents the cocoa butter from forming smooth, uniform crystals as it sets, which is what creates a glossy shine.